How to Perform Crevasse Rescue
By: Zack McGill
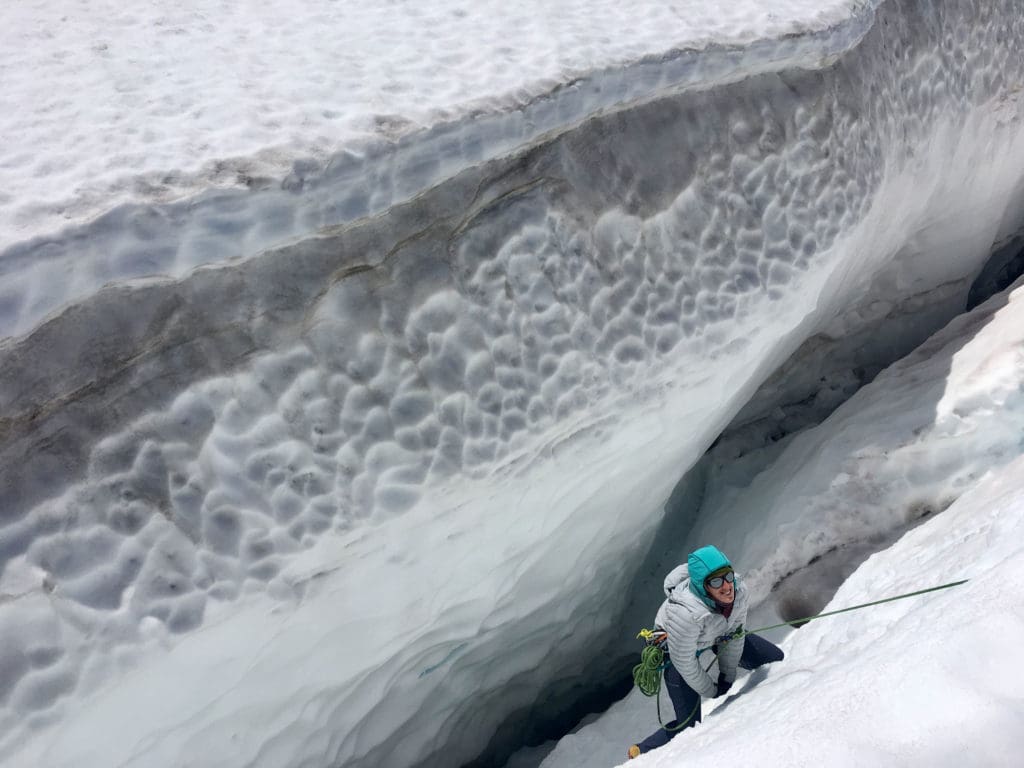
If you’re going to travel in glaciated terrain, you need to have crevasse rescue dialed. This resource is a collection of videos, photos, descriptions, and diagrams to help you understand some of the tools and strategies available to efficiently and safely extricate someone from a crevasse.
There are tons of ways to perform crevasse rescue and which strategy you use will depend greatly on the context of the situation you find yourself in. As always, it’s best to be proactive and not fall into a crevasse to begin with, but those pesky buggers can be tough to spot sometimes.
If you’re skiing or riding downhill, you likely do not have a rope on. So if someone falls in a crevasse, they will take an un-roped fall. Not awesome. If you’re mountaineering without skis, you’ll likely (should be) roped in glaciated terrain. If you don’t have experience rigging ropes for glacier travel, you should check out our resource on Rigging Your Rope for Glacier Travel before diving into this rescue specific component. We’ll touch on strategies for un-roped and roped falls in this resource.
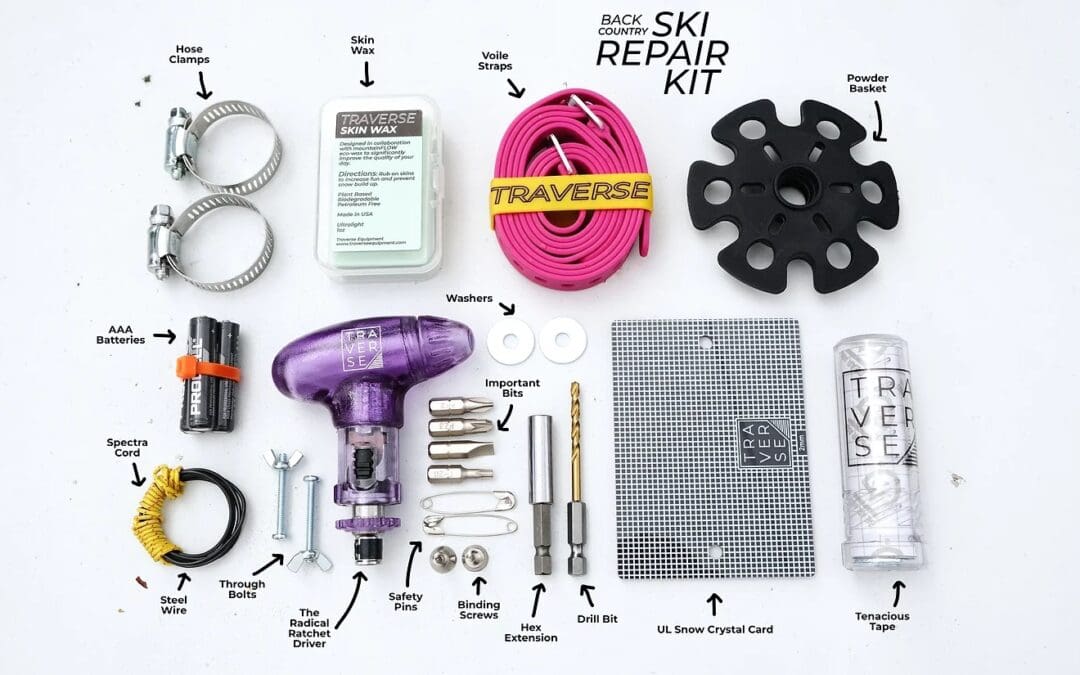
Essential Gear
First off, to perform crevasse rescue, you’ll need the right gear to get it done. You can carry more gear than listed, but the list below is what you should have at a minimum as well as some recommended tools that will make your life way easier. In addition to the list below, you should also have a harness, ice axe, crampons, helmet, rope, and some way to create an anchor in snow and/or ice. That could be skis, pickets, ice screw…
Minimum Gear Required
- 5x Locking Carabiners (Three HMS “pear” shaped, one “D” Shaped, and one Triple action locker with a captive eye).
- 2-4x Non-Locking Carabiners (Lightweight – mainly for racking gear, but make sure they’re the same size in case you decide to use them for your progress capture).
- 1x Prussik (We recommend the Sterling Hollowblock 13.5”).
- 2x 120-240cm Dynex Sewn Runner (At least one 180-240cm if you’re a taller human. This will greatly help with rope ascension).
- 1x Cordelette (6-7mm 23-30’ length).
- 1x ATC (If you need to rappel into a crack to get someone on a rope, rappelling is made a lot easier with the use of an ATC).
Optional Gear
- 1x MicroTraxion or SPOC (this tool will make everything run so much smoother. This is a standard part of any professional kit nowadays, but it’s expensive).
- 1x Tibloc (this tool is so much nicer to work with than a prussik – faster to put on, easy to adjust, and quick to remove).
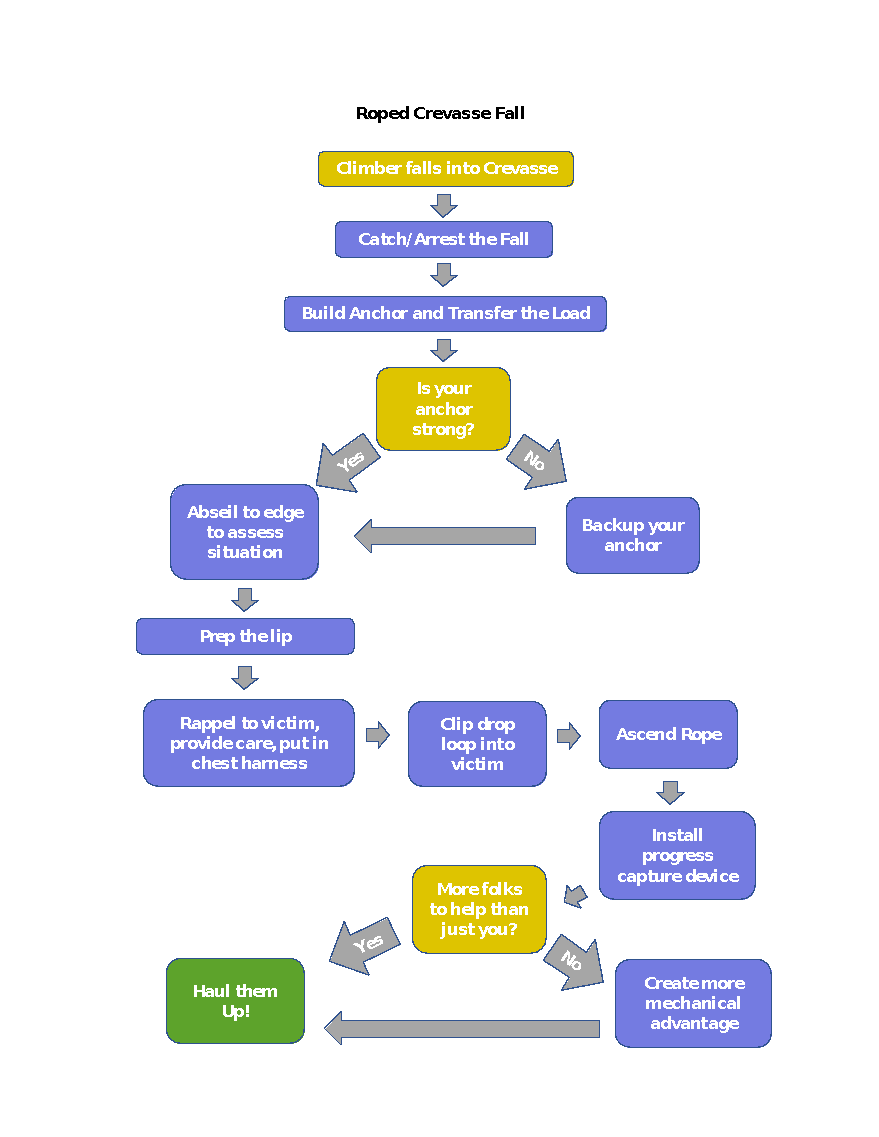
Roped Crevasse Fall
The first scenario here will be a roped crevasse fall. Below is a flow chart if you’re one of those folks who like to see the big picture or have a step-by step list. Again, there’s lots of ways to do this and what specific strategies or tools you use will depend greatly on the context: how many people are on your rope team, if there are others nearby who can assist in a rescue, what gear you have, who on the team fell in, the environment (steep or mellow?), etc. This scenario will be a demonstration of how to perform the most complex crevasse rescue: an unconscious victim dangling in a crevasse and no one else around to assist you. If you can understand how to perform this, all the other iterations will be easy.
Step 1: Catch the fall!
If you don’t accomplish this step… none of the rest really matter. Make sure you’re dialed on self and team arrest techniques and utilizing proper travel techniques (running belays, short pitching, etc.) in more consequential terrain to protect the squad in areas where self or team arrest would be hard or impossible. If you’re in a rope team larger than two, catching the fall should be easier since you have more than one person keeping the team on the mountain. If there is a separate rope team in the area, it can be fastest and easiest for the team holding the fall victim to just stay in self arrest and for the separate rope team to come in an and help perform the rescue. This can be done with a tractor haul where (once the second rope team gets a rope to the victim) everyone just stands up and starts walking. The person will pop right out! Just make sure that you have verbal contact with the person in the crevasse and that the lip is prepped adequately (more on that below).
Step 2: Build Anchor and Transfer Load
Once you catch the fall, all of the climber’s weight will be on you (unless you’ve tied some knots between the two of you and one of them is lodged in the lip). If you’re in a larger rope team, this is where one or two folks can stay in arrest position and another can build the anchor and transfer the load. If it’s just you and one other person and they fall in, you’ll have to hold their weight while building the anchor and transferring the load. This is often the most tiring and scary part of a rescue.
A tip for making this less scary is to have something to build an anchor easily accessible. A picket on the outside of your pack that you can quickly get to and drive in is often the simplest solution in snowy environments. The quicker you can get the load off of you and on to a solid anchor the better.
If you’ve tied in with an alpine butterfly or overhand on a bite and can clip the cord of cable from your anchor into the closed loop of your knot, that’s easiest. Then you can just lower their weight (by easing backwards) on to the anchor while watching to see how your anchor responds to the load (ready to go back into arrest if the anchor doesn’t hold). You can also take slack from the backside of your attachment knot and clove hitch it to the anchor cord or cable if you don’t have enough slack to reach your knot.
If the anchor holds, hooray! You can slap on a prussik on the backside of the now fixed strand that is holding your partner and escape out of the knot.
The video below does a great job of demonstrating this as well as how to transfer the load if you do not have a knot clipped into your harness as your attachment point.
Step 3: Back up the Anchor?
This is phrased as a question because it is! If you deem that your anchor is solid enough as is (t-slotted skis, picket backed up by a human, etc.) then you won’t need to back up the anchor. In case of doubt, take the time to back it up and ensure that your anchor is solid before proceeding. The video below demonstrates one way to back up a snow anchor. You can also utilize skis (if skiing) or a buried or slotted stuff sack or backpack.
Step 4: Assess situation at Lip
Now that your anchor is solid, you need to contact your partner in the crevasse. Secure yourself somehow (friction hitch, rappel, belay) so that you can get to the lip and not fall into a crevasse yourself. Approach the lip off to the side from where they fell in so as to not accidentally knock any chunks of snow/ice on them. It can sometimes be very difficult to know where the lip of the crevasse begins since the snow bridging the crevasse can be severely overhung (like a cornice). There could also be other crevasses between you and the crevasse they fell in. Having a probe to check snow depth in front of you is best, but a pole or ice axe at least gives you some idea that there’s some solid snow/ice beneath your feet.
When you get to a body length distance of the edge, it’s best practice to be clipped into the rope in some way as to not just rely on a friction hitch or munter in case you fall in as well. This is commonly referred to as the catastrophe knot or “cat knot.” MEOW. Estimate the distance to the lip and tie an overhand on a bight (or clove hitch) and clip it to your harness into a different locking carabiner. Try to make verbal contact with you person. Hopefully they can yell up to you and provide information about their condition and the crevasse. If they took a hard fall and are unconscious, you’ll need to go down into the crevasse to get them and provide care. Either way, you’ll need to go to the next step: prepping the lip.
Step 5: Prep the Lip
Before either rappelling or building a haul system to get them out of the crevasse, you need to create a clean exit for them. People have died from being hauled into an un-prepped lip of a crevasse. Off to one side from where they fell in, kick and chop away any overhang so that the exit/entrance is clean. Then, to ensure that the rope you’ll use to rappel, ascend, and haul on won’t cut into the snow/ice and become unusable (like the strand their hanging on likely is), you’ll need to pad the lip somehow. Using a shovel handle, backpack, ice axe, or trekking poles will do the trick. Just make sure they are near/at the edge, secured somehow so they don’t fall in, and have the rope running over them.
The video below walks you through Step 4 and 5:
Step 6: Rappel to Victim and Provide Care.
If the human is alert and able to help, you won’t have to do this step. You can simply lower them a loop off the backside of your attachment (if there’s enough) or the opposite end of the rope and go on to Step 8. If they’re unconscious, however, you’ll have to rappel in, provide care, and get them rigged for hauling yourself. For rappelling into the crevasse, take note of what diameter rope you are rappelling in on! If using a Petzl RAD line or similar 6mm glacier cord, you’ll likely need to either have a specialized device that is made for smaller diameter ropes to provide the necessary friction when rappelling, OR add additional friction to your standard ATC by adding an additional loop through the ATC. A standard rappel extension with third hand backup on a 8.7mm single rope is shown below.
After rappelling in, it’s best to attach into the rope with a clove hitch or hard knot for the same reason you tied the catastrophe knot approaching the lip of the crevasse. Just in case your third hand backup slips, have some redundancy! I prefer the clove hitch because it’s easily adjustable (making the next step go smoother).
To get them rigged for hauling, take a carabiner and clip it into their belay loop. If you’re doing a drop loop and you have a pulley, this is where you’ll want to put it! If they have one on their harness, feel free to grab it too. They don’t need it but you could. You can also put a micro or nano traxion here, but I’d only do that if you have two. Ascending out of the crevasse is way easier with a Micro Traxion. The reason to use a pulley at the harness of the victim rather than just a carabiner if you have the resources is that any friction created here gets magnified throughout the rest of your haul system.
Once you have a carabiner into their belay loop, clip the back side of the rope you rappelled in on through that carabiner (or the pulley attached to the carabiner). You might also need to take their backpack and/or skis off and get them upright in a chest harness. If other rescuers are with you, you can have them pull the backpack and skis up separately, or, if alone, take them up with you as you ascend out.
Step 7: Ascend Out of Crevasse
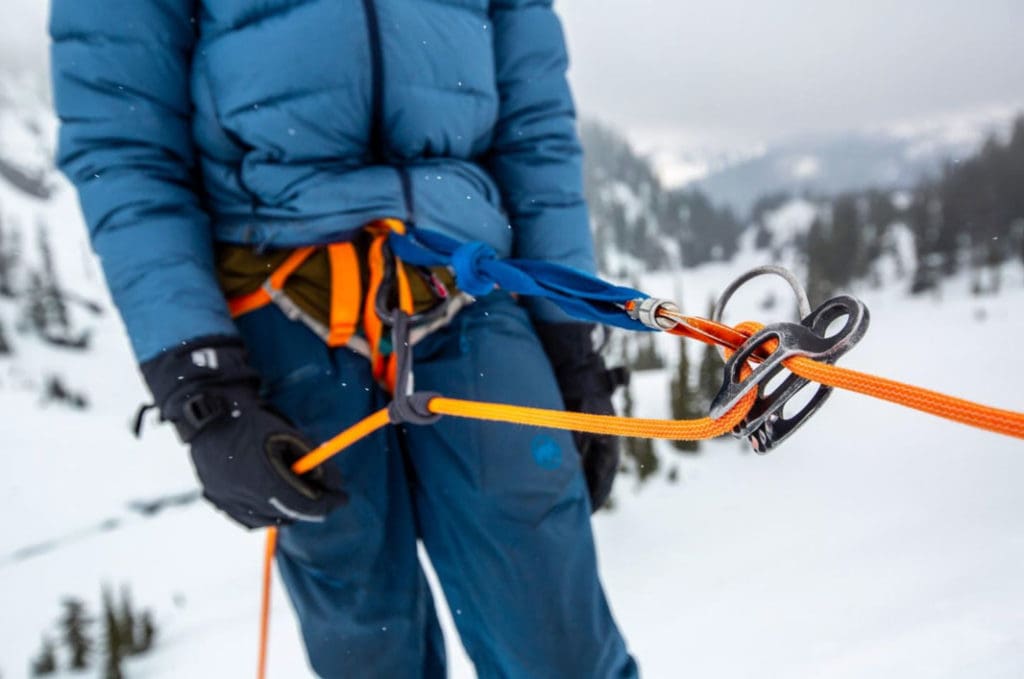
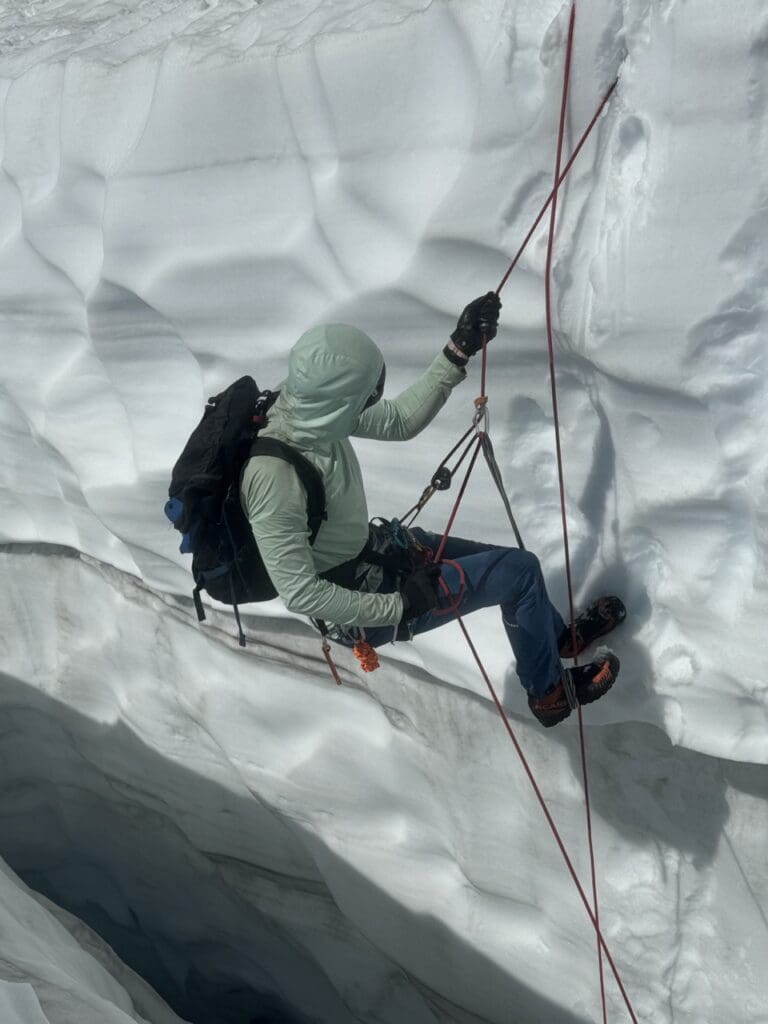
After you provide care and get them rigged for hauling you’ll need to ascend back out of the crevasse. There’s a lot of different ways to ascend a rope. Which technique you choose will depend on the tools at your disposal. The video below walks you through Step 6 and 7 and demonstrates one way to ascend out of a crevasse utilizing a prussik, sling, and ATC device. With skinnier ropes, you won’t want to use a standard ATC for this demonstrated technique because the ropes could twist, jam, or flip.
Alternatively, you could use a Micro or Nano Traxion for your waist and Tibloc in place of the foot prussik as seen in the photo below. Notice that the rope is also clipped from the Micro Traxion at the waist into the tibloc in order to get some mechanical advantage to ascend. There is also a clove hitch as the back up clipped into a carabiner beneath the Micro Traxion.
Step 8: Haul Victim Out
Once back on the surface, make sure your ropes aren’t twisted and your scene is dialed. Take the time to stack ropes and keep things looking clean. Install your progress capture device (ATC in guide mode, ATC or pulley with minded prussik, Micro Traxion, Garda Hitch, etc.) The video below demonstrates three different examples of progress capture devices.
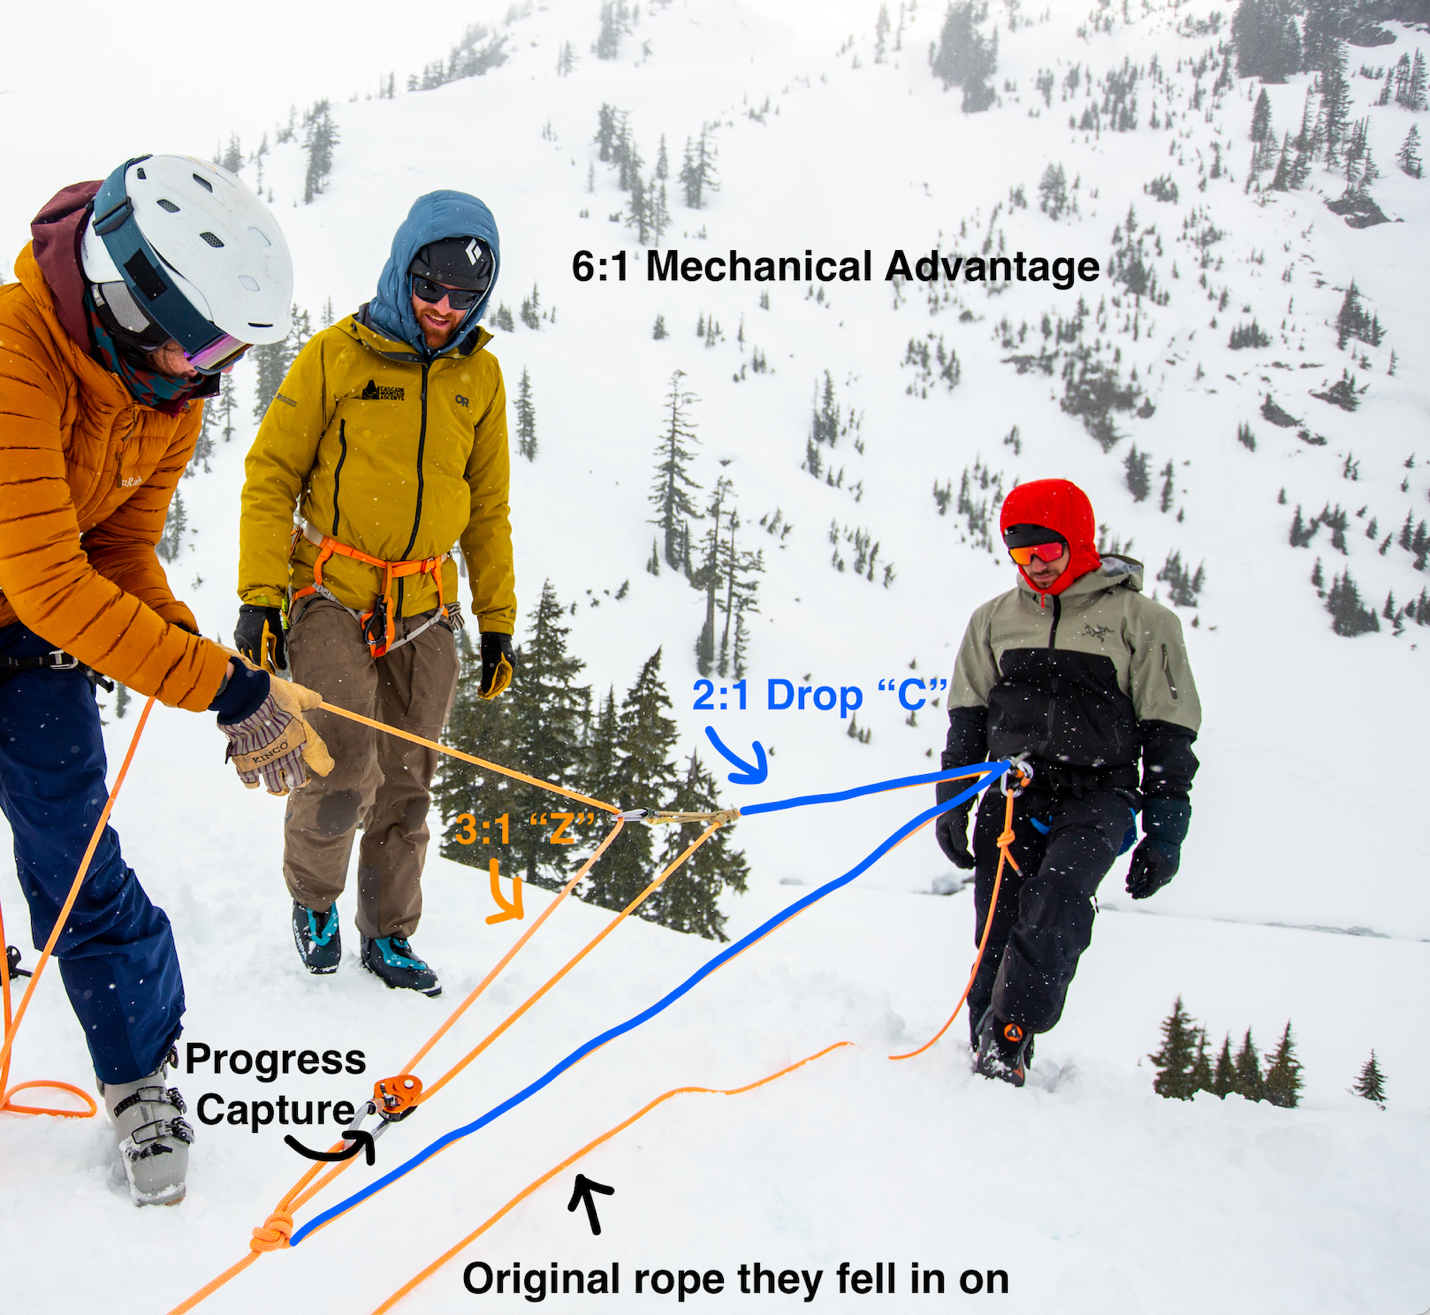
Now that your progress capture is set up, you can decide to start hauling or create more mechanical advantage. As stated before, how much mechanical advantage is needed will depend on if the person in the crevasse can help you out (by helping to pull or climbing) and if you have more humans at your disposal to help haul. If it’s just you, you’ll need to create more mechanical advantage. The cleanest way to do this if you’ve set up the drop C system, is to stack a 3:1 on top of your 2:1 drop loop to get a 6:1 mechanical advantage system.
The video below walks you through how to do this.
If you’ve set up a direct haul with the victim clipped into the end of the rope, you can start with the 3:1 and then add a 2:1 on top of that to get to the same 6:1 mechanical advantage. I wouldn’t add any additional mechanical advantage than 6:1 or else your haul is getting diminishing returns. Yes it’s easier to pull, but you’ll need to move A LOT of rope. At a 6:1, every six feet of rope you pull up, the victim will rise one foot.
Un-roped Crevasse Fall
An un-roped crevasse fall is handled very similarly to a roped crevasse fall except that it’s often a lot more dire. Un-roped falls most often happen on the way down a glaciated mountain on skis or a snowboard. Being un-roped, there’s nothing to arrest the person’s fall and they will fall until they hit something — usually a shelf in the crevasse or where the crevasse pinches down to be too narrow to fit through (“getting plugged”). Neither are great.
The good news for rescuers (if you can even call it that) is that you no longer have to arrest the fall or hold someone’s weight while building an anchor. You can jump right in to building a strong anchor. The diagram below walks you through the steps.
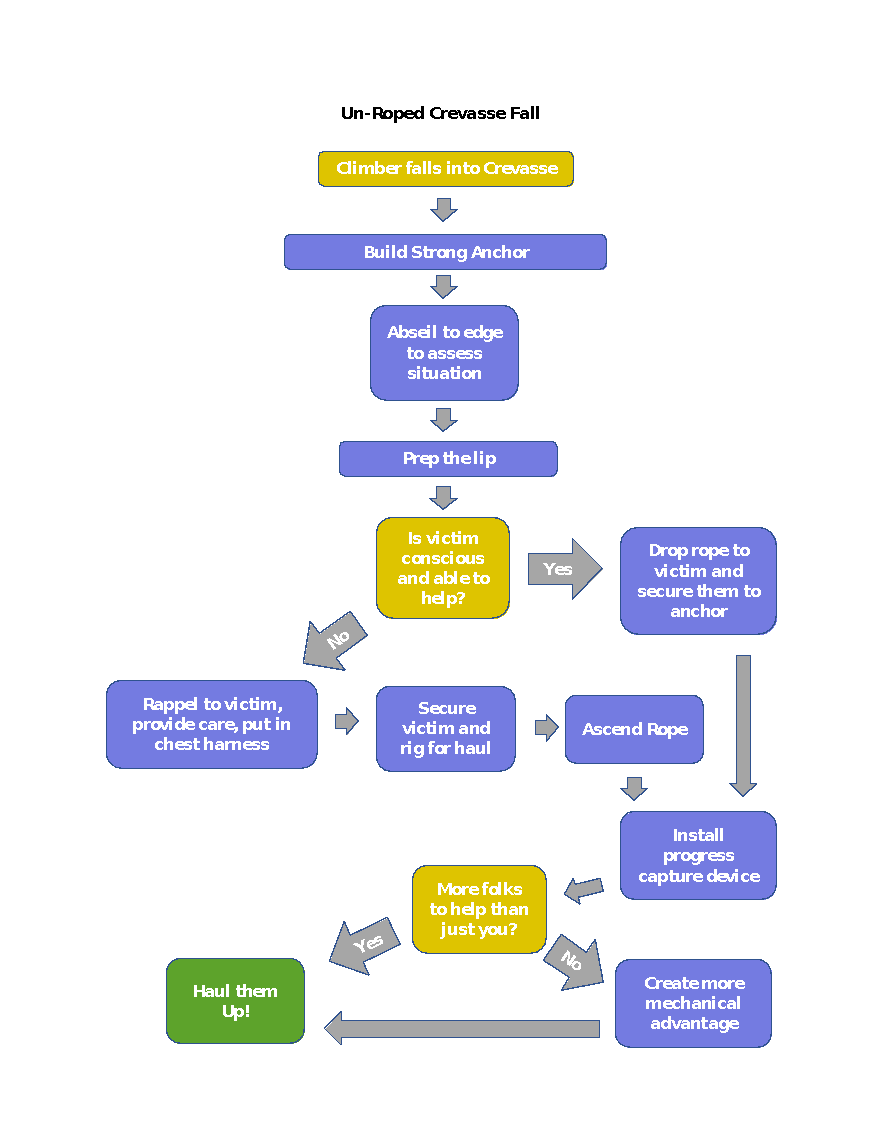
You’ll notice that the steps are very similar. The major change is that you’ll need to get a rope attached to the person in the crevasse as soon as possible to make sure that they don’t fall further into the mountain. In addition, if the victim gets plugged (or falls into a crevasse that pinches down so that it is too narrow for their body to pass through), the belay loop of the harness will likely be completely unaccessible. In order to get a rope attached to a plugged victim, it’s best to be proactive and already have a higher attachment point rigged up in case of this scenario. It’s become pretty common practice now for skiers and riders on glaciers to travel on glaciers with a sling or some other tether attached from the belay loop of the harness to higher on the shoulder or backpack strap that’s accessible from above.
Final Thoughts
As you can see, crevasse rescue at first can be mighty overwhelming. It’s also a perishable skill and one that is routinely progressing as tools get lighter, sexier, and more streamlined. We’ll update this resource with the latest as we can, (Last update May 2nd 2025) but nothing replaces mentorship from professionals. This resource covers a lot, but doesn’t touch on all the scenarios out there or even all of the techniques at your disposal. Also, nothing beats hands on experience. To that end, there are many crevasse rescue course options out there.
If you’re looking for mentorship on not just crevasse rescue, but glacier mountaineering skills in general, we’d recommend a Glacier Mountaineering Course or Glaciated Ski Mountaineering Course if you’re a skier or rider. If you’re pretty dialed on the basics and are just looking for the latest and greatest of crevasse rescue, then take a Crevasse Rescue Course. Regardless, get out and practice with your team before entering terrain where you could need crevasse rescue. Even if you feel dialed, make sure the folks you’re traveling with are too.
As always, check out The Alpine Climbing Guide for more information like this.