RESOURCES for Avalanche Educators
By: Zack McGill
First off, whether you are a new instructor about to instruct your first avalanche course or a seasoned course leader, thank you for being here. The purpose behind The Avalanche Educator Resource is to provide a place to compile resources, activities and lessons specific to recreational Avalanche Courses offered in the United States (Level 1, Level 2, and Avalanche Rescue).
This resource is by no means a replacement of the curriculum and tools provided by AIARE, AAI, or other AAA blessed providers of curriculum, but a supplementary resource that can take your teaching game to a higher level. Feel free to take any of these activities and use them as they are, adapt them to fit your style, and share them with other instructors. This resource is hardly inclusive of all that’s out there, but we would love for it to be. So if you have an activity or lesson that you think is worth sharing, please contact Zack McGill: zack@cascademountainascents.com and he’ll get it up here.
If you see some activities that you already use listed here and you’re sure you were the true master mind behind the activity, just let me know! Happy to give credit where it’s due. Many of the activities listed are from folks who don’t know where exactly they came from, but thought they were worth sharing. It’s all in the spirit of making the community better.
Zack’s Soap Box
This section is my opportunity to use this forum to have a soap box moment and convey my thoughts on the avalanche education industry and this resource. I hope that you read it… If you’re just here for the activities and could care less my views, that’s cool too. You can SKIP AHEAD to the activities.
We have an important job as avalanche educators to set students up for success. Our mission is to save lives. This shouldn’t be taken lightly. The people we send out into the backcountry after our courses make decisions based on what we’ve taught them. We owe it to them to deliver a quality product!
This is easier said than done, however… especially if you’re a new instructor. Tweaking your powerpoint presentations to include your own photos, knowing what slides or text to take out, inserting engaging activities into lessons… this all takes time, but it’s those personal touches that make the material relevant and memorable to students. In my experience, most providers don’t pay instructors or course leaders for the time they spend updating their lessons before each season, or, if they do, it’s not very much.
Some instructors are intrinsically motivated and put in the time to make lessons exceptional regardless of whether they’re getting paid or not for that labor. I’ve also sat through quite a few “death by powerpoint” presentations and heard dozens of horror stories from students and fellow instructors who’ve suffered the same. As one of those intrinsically motivated humans, those presentations hurt me, but I understand why some folks would just put in the minimum effort required to do the work. Why should they do work for no compensation? Really… they shouldn’t.
If you are a provider of avalanche courses, you should provide some amount of compensation for pre season prep. That can take the form of paid training in the field and the classroom or just paying hourly for the work they do. I think most humans who get into this work are well intentioned, just not set up for success. Compensating folks goes a long way to encourage them to put in the work to make an exceptional product.
I personally spend DAYS reworking my presentations and activities before each season to include the latest and greatest tid-bits from humans way more intelligent than me. Good news is… avalanche courses pay way better than day guiding, so I feel that extra effort is somewhat compensated for in the long run. Kind of…
Avalanche courses should pay better because they require a more robust skillset. You not only need to understand the data and nuance of avalanches, but also be able to package that information in digestible and well-scaffolded pieces so students actually retain some amount of the fire hose of information we blast at them. This of course is in addition to the ability to guide other humans in hostile environments, ski or ride well, and have at least a WFR/CPR cert.
Some folks are naturally good educators, but even the most gifted educator needs mentorship and guidance to do this job well. So if you’re just starting out on this journey to teach avalanche courses, don’t worry… even if you aren’t naturally gifted at teaching, you can still learn activities, tips, and tricks to provide amazing lessons to students. This resource is a part of that, but hopefully you work for a provider that recognizes the importance of mentorship and training and creates opportunities for professional development.
If you’re a veteran instructor or course lead, do your part to be mentors and leaders in the industry. Provide feedback to those newer to the game and go out of your way to be there. We all stand on the shoulders of those that came before us. I wouldn’t be where I am without the extra effort of folks like Joey Thompson, Mike Soucy, and many others who put on trainings or let me buy them a beer or dinner in exchange for letting me barrage them with questions.
Hopefully if you’re still reading this you’re in it for more than just the paycheck and seeking to learn something new, become a better educator, and further the mission. I hope this helps you on your journey.
-Zack McGill
Contents
This resource is broken down into eight sections:
- Organization (Resource for Course Leads and Providers on how to build an effective itinerary)
- Zoom Teaching Strategies (Resource on tips and tricks for those teaching primarily online)
- Level 1 Classroom (Activities and lesson plans for online and in-person classroom for the Level 1)
- Level 1 Field (Activities and lesson plans for the field for the level 1)
- Level 2 Classroom (Activities for online or in-person classroom for the Level 2)
- Level 2 Field (Activities and lesson plans for the field for the level 2)
- Avalanche Rescue (Activities and lesson plans in the field specific to the Avalanche Rescue Course)
- Continuing Education (How do I get better?)
Click around to what you need and again… please reach out if you have any other additions or have something you’d like to see!
The Power of Organization
Where my Course Leaders or Providers at? This section is for you. Whether a course is ultimately successful comes down to you and how organized you are. On a single course you’ve got 18 – 24 students, your instructor team, folks shadowing you, and potentially a grip of gear rentals needing to go out to folks who’ve never held a split board in their life. That’s a lot of kittens to wrangle! The most powerful tool to keep things on track (whether doing in-person or online classroom) is a well organized and thorough digital itinerary.
Itineraries will look different based on your venue and if you are teaching in-person or online, but here’s an example itinerary: Sample Itinerary for an AIARE 1 & AIARE 2 utilizing an online classroom.
At the least, all itineraries should include these pieces:
- Realistic lesson, activity, and break times.
- Who is teaching the particular section.
- The major points you’re teaching (to make sure that you get them all).
- Hyper-links to whatever resources, videos, websites, or activity descriptions you’ll need where you’ll need them.

Times
It’s important to set realistic time goals and then hold each other accountable to staying within those time margins. It’s easy to get into the weeds on topics (especially with students that ask a lot of questions) but remember the sage wisdom of KISS… Keep it simple, stupid. If you go over the time on one lesson, you’ll be rushing through the next.
Who’s Up?
Make sure that any teaching topics are assigned at least a week in advance so that instructors have time to prepare their lessons and even receive some feedback from you or others before going live. For new instructors you’re working with a lot, it’s nice to have them teach the same thing a few times to gain confidence and adjust their presentations/activities. They then can observe you teaching other topics a few times before eventually transitioning into teaching those themselves.
Major Points
It’s easy to lose track sometimes of the big picture goals of each lesson section, so write them down in a few places! Towards the beginning and ends of your presentations, in the itinerary, and/or in quizzes or polls! Repetition is actually needed for retention so hit the important bits hard.
Hyper-Links
You’ll notice in the sample itinerary that anytime a link needs to be put into the chat, that link is right there in the itinerary. This makes it easy for those presenting to move into the next activity or topic without having to click around to different pages or lose their place. You’ll also notice that the links go to activities and resources that live on our business operations google drive. This way, whoever comes in to work an avalanche course for us doesn’t need to know anything about how we organize or structure our online resources or how to access them. All they need is the itinerary and they link directly to those resources. Huge time saver.
Zoom Teaching Strategies
Provided by: Nicholas Vincent “Vince”
Below are some considerations for instructors to maximize their effectiveness in teaching over Zoom. The platform has several tools that apply to teaching avalanche education and in many ways can make us more effective educators. Remember… just because these tools are available doesn’t mean you have to use them all. I encourage everyone to figure out what works for them. It would be great to continue accumulating feedback and best practices within this document as we progress in the fourth discipline that is Zoom.
The video below is a great place to start. It highlights a good sample of best practices for teaching in a virtual classroom and the tools available in Zoom. Many of the items listed below came directly from its content. More functionality is available but these tools will get it done. This video was a collaboration between AIARE and AAA.
The password is: zoomtips2020*
Considerations for Course Leaders Pre-Course
- Assign co-hosts before the meeting starts. This allows the co-hosts to enter breakout rooms and let people into the meeting from the waiting room.
- Have a tech person to answer chat questions, post links, and troubleshoot technology
- Have your links that you plan on sharing preloaded in your browser tabs or in google drive.
- Message people in the waiting room that you will begin shortly.
- Ensure, the best you can, that technology is reliable and ready to go. Everyone should be on their PERSONAL laptop. Swapping laptops is not ideal. Highly recommend dual monitors for presenting.
- Provide some Zoom etiquette, training, norms right away.
- Collect Field Group Information right away!
On-Screen Strategies
- Lighting – Ensure your face is lit up so people can see your mug. Lights/sunshine behind you create an insufferable glare. Drop the blinds or turn those lights off.
- Background – The virtual backgrounds are cool. Just make sure nothing that shouldn’t be in a classroom isn’t behind you. I appreciate when people speaking have things behind them that give clues about who they are.
- Eye Contact – Look at the camera (or past it) when addressing the class. Try not to focus on the class or elsewhere for too long. Keep a good balance of eye contact.
- Speech – Just talk naturally as you would to anyone. Be aware of your volume and don’t be a robot, use inflection.
- Non-Verbal Comms – Use your hands and arms when teaching. Move back and forth into the camera. It’s easy to just sit back in your chair and talk. Engage the class by being dynamic.
- Headphones with Mic – This is the ideal setup for clear voice delivery and audio.
- Computer and Monitor – Do NOT use anything besides a computer to teach. Zoom functionality changes on phones and tablets. It also becomes increasingly unreliable and wonky. Two monitors are highly recommended if using PowerPoint. Swapping laptops is also not ideal but does work.
- Provide Direction – Give people clear and concise directions to how they should respond in a particular order, what they are doing in breakout rooms, and how
- Timing – We only have 7 hours between the two classes. Use your time wisely and stick to your itinerary.
Teaching Tools
- Chat Box – Use the general chat box to provide links, info appropriate for the whole class, ask/answer questions, and as a tool to solve issues. Coach people to private message instructors for tech problems or other personal issues/questions to avoid blowing up the general inbox.
- Screen Share – As you know, this is used to deliver media presentations or anything else on your screen. It is CRUCIAL that you check the 2 boxes at the bottom of the ‘Screen Select” prompt after initially clicking screen share. Both Share Computer Sound and See pic below.
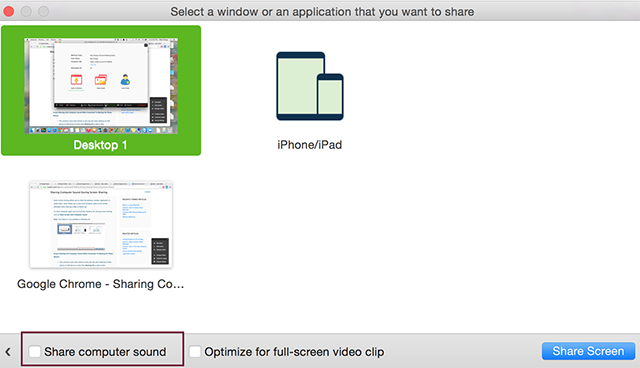
- Students can also share screens which can be helpful in breakout rooms
- Two monitors are HIGHLY recommended
- Annotate is a feature within screen share that lets folks draw on your screen. This can be used to fill out trip plans, markup photos, draw in descents, etc. Its located on the drop-down bar at the top of the screen. If it’s not there, it might be in the options menu. Every student has access to draw at the same time and their drawings are labeled with names. Lots of fun options to explore here
- Breakout Rooms – This is a fun tool that lets folks work in small groups. You can pre-assigned groups before class or randomly during the meeting (pic below). See strategies and screenshots below

- Share screen and chat functions are localized to individual break-out rooms.
- Host and co-hosts can bounce between breakout rooms to facilitate or share resources
- Take screenshots of the work done in small groups to later share with the entire class
- Provide links to the whole class via the chatbox and have them click it BEFORE the breakout session.
- Use a Google Doc via instructor shared screen to record ideas/info in small groups.
- Under options, you can assign a timer which is a nice feature
- See additional breakout room options below in the screenshot
- Zoom Help Center Breakout Rooms Video

4. Reactions and Nonverbal Feedback – These are a good way to get a quick gauge of how people are doing. Reaction options depend on which version of Zoom people are using. At a minimum, it will have clapping hands and thumbs up.

5. Polls – These are a great tool for checking understanding, giving a pop quiz, eliciting feedback in the middle of a lesson, and lots more.
- They can be preset before the meeting or even during. Polls will provide
- Max 25 polls per meeting
- The host has a poll function on the toolbar
- Answers can be anonymous
- Answers can be a single answer or multiple choice
- Polls give results that you can share with the class
- Zoom Help Center Polls Video
6. Whiteboard – Just like it sounds, it’s a whiteboard everyone can annotate. Its located under the screen share feature and comes up as one of the options during the “select screen” prompt.
Back to Top | Back to Zoom Teaching Strategies
Level 1 Classroom
The following activities and lesson plans can mostly be used for in-person as well as online classroom sessions, though some are certainly specific to in-person. More and more, folks have embraced the online classroom, and though I enjoy teaching in person classes, I see why. It’s way easier for folks to not have to take a day off from work and just use their weekend to complete a course than to take a Friday off.
For online Classroom, Zoom is a fantastic tool for teaching if used effectively. One of the best features is the ability to do breakout rooms and split people into smaller groups to work through an activity. This forces students to actually interact, have opinions, and engage with the material in ways that a larger group setting just can’t. Instructors can then bounce around between breakout rooms to answer questions and provide guidance where needed (just like you’d do in-person).
Regardless if you’re doing in-person or online classroom, there’ll be some helpful activities and lesson plans in here for you!
Course Introduction | Avalanche Problems | Track the Season’s Conditions/Snowpack | Human Factor | Avalanche Terrain
Course Introduction Activities
Starting off courses with activities is a good move all around. It’s a great way to break the ice and get folks talking/engaging with each other and the material. Below you’ll find some activities to bring in at the start of your level 1 course.
Case sTUDY ACTIVITY
Provided by: Zack McGill
To get students immediately engaging with the AIARE Framework as well as each other, this activity is designed to be used in conjunction with a case study at the very start of course. In this example, we use the classic Hatcher Pass Case Study, but it can be adapted to whatever Case Study you want to use. I like having folks read through it individually first and then show the video.
After the video, then do the breakout room or in-person activity below:
Case Study: Hatcher Pass Case Study
- Introduce yourselves.
- Choose Speaker (Person responsible for presenting findings to large group and who will lead you through the breakout room).
- Link reasons why this accident happened to parts of the AIARE framework:
- Room 1: Prepare – How familiar were they with conditions? Were they familiar with avalanche rescue? What experience did they have in avalanche terrain? Was this good experience?
- Room 2: Plan – What were the group members like? How much experience did they have? What did they do to anticipate the hazard? Why do you think they ignored their pit results?
- Room 3: Plan – What was the route/terrain they chose to ride like (simple, complex, slope angles, etc.?) Did they have an emergency plan? What did they do once the emergency happened?
- Room 4: Ride Safely – What did they do to monitor conditions along their route? Did they check in with the group or reassess the plan? What was the terrain like that they rode? Did they use terrain options to reduce their risk? Or increase it? What travel strategies did they use that worked well? What travel strategies did they not use?
- Room 5: Teamwork – Do you think they used good teamwork? Do you believe every voice was heard? What was their group culture like?
- Room 6: Debrief – Pretend that it was your squad that was involved in this incident. How would you debrief the day/incident? What were conditions like? Did you make good decisions? How would you improve the plan so that nothing like this happens again?
4. Present to the rest of the group once the breakout room ends.
Confirmation Bias & Monkey Business Activity
Provided by: Daniel Simons with adaptations by: Kenzie Carson
LEARNING OUTCOMES:
● Students will be able to define confirmation bias and link it to how bias may inform decision making in the backcountry.
● Students will have an understanding of the importance of checklists as a tool to combat confirmation bias
VIDEOS: Monkey Business Illusion
PRACTICE/ACTIVITY:
This activity can be structured by watching the video first then breaking students into small groups to discuss ideas of how to combat confirmation bias
OR
This activity can be set up by defining confirmation bias first (Confirmation bias is the tendency to search for, interpret, favor, and recall information in a way that confirms or supports one’s prior beliefs or values), watching the video then discussing in small groups ways to combat confirmation bias.
Prompts for student discussion:
■ What were you focused on in the video? (Likely the thing you were told to look out for, contributing to tunnel vision)
■ If you noticed the curtain changing, the player in black leaving or the gorilla, what allowed you to notice those things?
As students are brainstorming and discussing learnings from the video, point them to the Assemble Your Group checklist in the upper right hand corner of pg 2 of bluebook and terrain mindset on pg 3.
Describe the importance of checklists and routines in countering bias in individual and group decision making.
Checklist and Teamwork act as a backstop for our blind spots. The checklist catches the things we forget or aren’t paying attention to, other folks may notice things we are not noticing and be able to contribute to a broader understanding of terrain, weather, snowpack or human dynamics.
Demonstrate how the two tools on pg 2 & 3 of the blue book help guide a daily mindset to combat bias once you and your team are in the backcountry.
Zoom Intros Activity
Provided by: Zack McGill
If you’re using zoom to teach online classrooms, it’s good to introduce students to the tools and etiquette they’ll be using for course before blasting too quickly into the curriculum. To keep things timely, it’s nice to combine the teaching of zoom tools and etiquette with student introductions!
- Start off your introduction by launching a poll asking folks on their level of experience with zoom from novice to Jedi master (or whatever you want to put in there). This gets them acquainted with the polling feature and lets you know who those folks are that will need extra help and maybe those students who are better at zoom than you are and can help you out if you start to blow it!
- Show them where mute for audio and the video on/off buttons are and talk through expectations around those things. I default to videos always on unless we’re taking a break or you’re going to do something that none of the rest of us want to see. I also like to show them where the reactions buttons are since every once and a while I’ll be asking for a thumbs up if they’re done reading something and those little emoticon thumbs stick around.
- Show students how to change their backgrounds so that they can hide any distracting or unprofessional/embarrassing surrounding in their background.
- Introduce them to the chat box and ask them to type their name and a one sentence goal for course. Let them know that this is where they can ask for tech help or ask questions so that they don’t interrupt the flow. Just make sure they know they can chat with individuals or everyone and to default to everyone unless it’s a question they want to keep private.
- Next put up a picture of a map of the US (or wherever most your folks are from) and have them annotate (sticker, drawing, etc) where they’re from. Those from somewhere not on the map can type with the text icon where they’re from. This gets them used to the annotate feature which they can utilize for terrain activities later.
By going through these things on zoom, you get everyone on the same page with zoom tools and etiquette and get to learn a little about the students without taking a bunch of time to have them each introduce themselves.
In Person Making Tour Groups Activity
Provided by: Zack McGill
- When preparing for the classroom space for the day, pass out notecards and write these prompting questions up on the board:
- Notecard:
- Name.
- Who you’re here with (if anyone).
- Travel Equipment (Skis, Split, Snowshoe)
- Backcountry Experience.
- BEGINNER I’ve never (or only a handful of times) toured in the backcountry before.
- INTERMEDIATE I’ve toured a bit and been exposed to a variety of conditions in the backcountry.
- ADVANCED I’m a strong rider with at least a few seasons of experience touring in the backcountry riding a variety of conditions.
- EXPERT Skiing/Riding is life. I tour in the backcountry 60+ days per year and have many years of experience.)
- Prompt folks to complete them while they’re waiting on everyone to arrive.
- Collect these notecards at first break so you can make groups of folks of like ability level (or not) and ensure folks who tour together are placed together.
- Notecard:
Back to Top | Back to AIARE 1 Classroom Activities
Avalanche Problems
There’s tons you can do with avalanche problems that doesn’t involve you flipping through the slide deck. Willie Webster, for instance, before day one in the classroom assigns/volunteers each student an avalanche problem. They can read about it in the back of the blue book and watch some YouTube videos. Then in class they get to describe it, what signs to look for, etc. with the group. Here’s a couple other activities and lesson plans to give you some ideas!
Avalanche Problems Review and ForecasT Activity
Provided by: Dan Sandberg (MSU)
- What is an avalanche? Is any moving snow an avalanche?
- Is every avalanche a concern? What are the hazards? (asphyxiation, trauma)
- What is the value of having these 9 avalanche types defined? Point out specific relevance for why it is important (ex: glide avalanches are almost impossible to forecast, very specific paths and conditions, uncommon, slow moving, glide crack as a “tell”).
- Showcase videos of each avalanche problem, allow for questions. AIARE online course has a good text description of avalanche problems under “Anticipate the Hazard” and includes the “Avalanche Problems Explained” video but no video footage of any of the nine types.
- Discuss the approximate timing and relevant observations/warning signs for each avalanche problem type. Consider using the Avalanche Problem Toolbox graphics around avalanche behavior, remote triggers, and Reliability of tests and observations to supplement your presentation
- Highlight the Avalanche and Observations (A & O) Reference Page as a resource that we will use for tour planning.
- Activity: Use current day’s forecast and 1-2 additional forecasts with a different avalanche problem. Have students:
- Identify any terminology that they don’t understand (i.e. SWE, avalanche danger scale ratings)
- Identify the observations/warning signs that would clue us in to the presence of this avalanche problem on this day. Reference the Avalanche and Observations (A & O) Reference Page: Focus on observations that get at the presence of an avalanche problem rather than its sensitivity/reactivity.
- Identify the avalanche problem(s)
- Identify generally where in the terrain the avalanche problem(s) are most likely to be (you can use the 3D mountain if you’d like)
Avalanche Problems as Animals
Provided by: Zack McGill
Instead of you flipping through the slides and doing the talking, have the students do it for you! This activity splits the students into teams of two-three utilizing the breakout rooms feature for online classroom or just splitting them up however you want in person and have them research a particular avalanche problem to teach to the class.
Here’s the activity:
Room 1: Loose Dry
Room 2: Loose Wet
Room 3: Wind Slab
Room 4: Storm Slab
Room 5: Persistent Slab
Room 6: Wet Slab
Room 7: Cornice Fall
Room 8: Glide
Room 9: Deep Persistent Slab
Directions:
- Introduce yourselves. Choose Speaker (Person responsible for presenting findings to large group). That person types up or writes down answers to questions.
- Use: Avalanche Problems and the A+O resource (Pg. 56-58 in Field Book) to answer these questions:
- If your avalanche problem were an animal, what would it be?
- How/where does it form?
- What does it look like?
- Warning signs? (red flag observations)
3. Come back to main group ready to share.
Students then have 1-2 minutes to teach the rest of the folks about the avalanche problem as you share your screen and show some photos of the particular avalanche problem being discussed. Be sure to make sure they are delivering correct information and jump in as needed to fill in any gaps and clarify points.
Avalanche Problems Sorting Activity
Provided by: Anne St. Claire
This activity is a good one to check for understanding at the end of teaching about avalanche problems if doing an in person classroom session. Pass out notecards with the avalanche problems written on them (if doing all 9, you should have 9 notecards passed out each with one of the 9 avalanche problems written on them). Then pass out other notecards that have the definitions of the avalanche problems written on them. Have students find their partner who has the corresponding notecard (definition or name). Then, once they have their partner, you can have folks sort themselves in several ways to bring out good discussions and make sure folks are understanding. Here’s some suggested sorts.
Sort yourselves from:
- The avalanche problem that is hardest to predict to easiest.
- The most destructive avalanche problem to least destructive.
- The avalanche problem that is longest lasting to shortest lasting.
The Avalanche Problems Spectrum Activity
Provided by: Eric Haskell
Directions:
- Divide students into 8 groups.
- Give access to https://www.avalanche.state.co.us/forecasts/help/avalanche-problems/ or use back of bluebook avalanche problems A+O resource.
- Assign each group a different problem, give time to review problem.
- Go through one spectrum at a time (See below) and have students align themselves on the spectrum, then time for them to talk to neighbors and arrange themselves accordingly, giving time for discussion and explanation of why their problem is where it is, and time for rearranging.
The spectrums are as follows:
- Consequence in terms of size(in general, these types of avalanches are town destroying on one side or would take my chances/small on other).
- Temporal (last all season on one side, last hours to day on other)
- Spatial (last from valley bottom to mtn top, all aspects on one side, very isolated on other)
- Ease of identifying (super obvious on one side and super difficult such as identifying individual snow grains on other)
5. Wrap up activity with each group putting all pieces together to explain how we manage each individual problem (i.e. identify and avoid, give time to heal, etc.)
Considerations:
- No right or wrong answers, but I will ask leading questions if spectrum is wildly skewed or students are not accurate with their explanation.
- Extremes of spectrum are on opposite sides of room and students arrange themselves on spectrum –supposed to be active. Be sure to emphasize the activity is gross generalization and that there are always exceptions.
- Also emphasize that any avalanche problem can be deadly in the wrong circumstances.
Back to Top | Back to AIARE 1 Classroom Activities
Track the Season’s Conditions/Snowpack
Understanding the snowpack as a level one student can be a difficult undertaking on a short three day course. Here’s some activities and lesson plans designed around getting students thinking about layers and interfaces, common snow grains, and everything snowpack.
Draw the snowpack activity
Provided by: Nicholas Vincent “Vince”
Turns out, folks in a level 1 usually have trouble differentiating layers and interfaces as well as even just visualizing what different weather events do to the snowpack. This activity is best done either early on in the track the seasons conditions lesson or at the end to check for understanding. We usually use it as a way to establish a baseline and get to gauge what students actually know about snowpack (have they paid attention at all to what’s going on out there at all?) before diving into showing what resources are available to them to inform what’s going on under the snow.
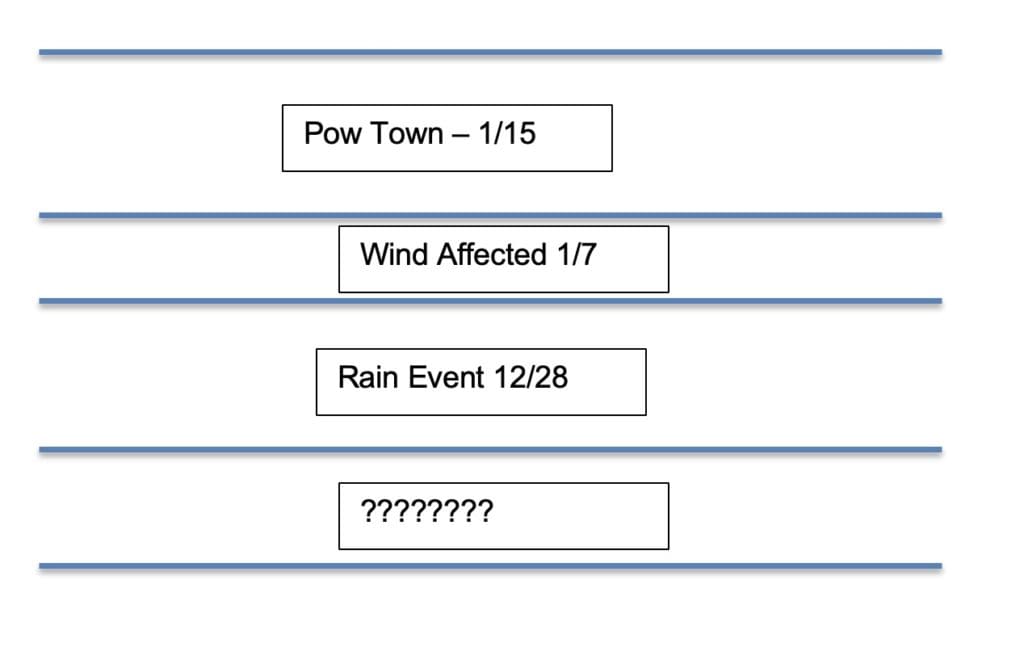
Summary of Activity – Gather information about what has happened this season and draw our CURRENT snowpack on the screen share white board for online or an actual whiteboard or big post its for in person.
Objectives for Online:
- Gather info using only memory and each others experience this season.
- Get a snapshot of the snowpack in the Baker Backcountry (or whatever zone you’re in). Pick notable weather and avalanche events and give them a name, symbol, picture, whatever… Hint: Keep it simple.
- Have a Zoom savvy person share screen and select white board. Draw the seasons snowpack as a team. Include simple grain types, significant weather events and identify avalanche cycles if you can.
- Take a screenshot of the whiteboard.
- Select a person to share screen and describe your summary of the seasons snowpack drawing using the info you just learned about.
Stacking Layers Activity
Provided by: Jason Speer
This activity is geared towards getting students thinking critically about layers and how they can come together to either create a relatively stable or unstable snowpack.
- Divide the class into 2-4 groups (depending on class size – groups of 6 work well).
- Give each group the same stack of layers. For in person classroom, this is best done on notecards or sticky notes that students can manually arrange on a table, wall, or white board. For online-classroom, just have the layers in a shareable document that folks can view.
- Tell 1-2 groups to arrange the layers so that the snowpack on the whole is considered more stable.
- Tell the other 1-2 groups to arrange the layers so that the snowpack on the whole is considered more unstable.
- Come back together after they’ve completed the task and have them share their stacks and explain why they think the snowpack is more stable or unstable in those configurations.
An example of a stack of layers you can provide is as follows:
- 15cm of new, low density snow.
- 5cm thick melt-freeze crust
- 40cm of wet melt forms
- 30cm of dense, wind affected snow.
- 10cm of very faceted snow.
- 50cm of small, compact, rounded grains.
Interactive Snowpack Activity
Provided by: Craig Muderlak
Goals: Foster a more intuitive understanding of snowpack structure and how layer configuration correlate to snowpack stability.
Backlink: Track season’s conditions/weather (red flags), snowpack (hand hardness and layer ID), terrain characteristics that affect snowpack.
Venue: In person – classroom or in the field
Outline:
1) Print out page 1 and 2, cut cards and laminate for use in the classroom or in the field.
2) Hand one “Snowpack” card to each student.
3) Instruct them to create an “unstable” by lining themselves up with one end of the line representing the top of the snowpack and the other end the bottom (discuss)
4) Next, have students rearrange themselves with the same cards to create a “stable” snowpack without adding or removing any cards.
5) Next add 1 card from the “Weather/aspect/terrain” stack and ask groups how this added factor will affect the snowpack/avalanche hazard. Continue to add cards with the same questions. With some of these, there isn’t a straightforward answer. That’s okay. This will elicit discussion and “what if’s” which is good.
6) Allow students to remove or rearrange one card if necessary to create a stable snowpack – or ask what changes in weather or snowpack would be necessary to stabilize the snowpack.
* Considerations: making two groups if there are more than 6 students.
– Additional interactive challenge: One group picks a card from the leftover cards (snowpack or weather/aspect/terrain cards) and strategically places it within the other group’s lineup attempting to tip the “opponent’s” snowpack into a more unstable one. This could be done back and forth between the groups. Can close with asking groups what it would take to stabilize their snowpack.
– Variations – adjust card titles to match the group. Simpler cards for AIARE 1 and more complex for AIARE L2.
| Near Surface Facets1cm4 Finger hardness | Basil Facets (Depth Hoar)10 cm | Surface Hoar5mm grains |
| Graupel1cm | Rounded grains30 cmPencil hardness | Sun crust1 cmPencil Harness |
| wind slab5cm1 finger hardness | Ice layer5 cm | rounded grains30 cm4 finger hardness |
| moist storm snow15 cm4 finger hardness | light/dry storm snow30 cmfist hardness | Rounds50 cm4 finger hardness |
| Facets10 cmFist hardness | Rain Crust1 cmPencil Harness | Melt Freeze Crust10 cmKnife Hardness (AM) |
Weather/Aspect/ Terrain
| Sunny | 38 degree Slope | Shady Aspect |
| Solar Aspect | TemperatureOvernight low 25 degree F, daytime high 40 degree F | TemperatureHigh of 15 degree F |
| Cloudy/overcast | WindModerate (20mph) | Snowing4 cm per hour |
| RainHeavy | 25 degree slope | SnowLess than 1 cm /hr |
| Freezing RainLight | Temperature34 degree F temp | WindLight (10mph) |
Snowpack Art Project
Provided by: Kenzie Carson
Goals:
Connect tracking the season’s conditions via a snow and wx log to identify where problem layers may exist.
Materials:
Large pieces of paper like flip chart paper, markers, colored pencils or pens
Outline:
- Break class into groups of 2-3
- Give the group weather history to build a snowpack such as:
October: 6-8” fell
Late Oct: Dry cold spell
Nov: 12” fell with cold temps
Mid Nov: Sunny and warm conditions
Late Nov: 2-4” fell every day for three days
Early Dec: Clear, Cold, Calm nights
Mid Dec: 2’ of snow fell over four days
- Have each group draw out the season’s snowpack
- Have them Identify the following:
- Where would you anticipate hard over weak layers?
- Which interface are you most concerned about?
- What do you think the current avalanche problem may be?
- If you went for a shralp in mid December, what would the conditions be like? Pow town? Firm fun? Bullet proof…. Etc.
- What would this snowpack need to become more stable?
- Can have each team do a show-and-tell presentation and compare what each team got.
- How did each group interpret the wx events differently or similarly?
Allow for some time for them to discuss why they think different weather events would produce the layers and interfaces they drew.
Snow Slang Activity
Provided by: AIARE Instructor Manual.
You know more about snow than you realize!
- Have the Participants break up into groups of 2-3. Write down as many names for snow as they can come up with. NO SCIENTIFIC NAMES!
- Think of the best snow day of your life. What was the snow like? What was the weather like that led to that snow?
- Think of the worst snow day of your life. What was the snow like? What was the weather like that led to that snow?
- So just with these personal anecdotal stories, we instinctively know that not all snow days are equal. With each storm, the snow falls out of the sky at different rates and different times, with different winds, temps, etc. We also know that snow changes over time for better or worse.
Snowpack Exercise
Provided by: Chris Pruden
Goals: Increase student understanding of how different wx factors influence and change the snowpack. Make a connection to how changing snowpack factors can influence terrain mindset.
Materials:
Boards with velcro and colored velcro strips to build snowpack with different colors
Outline:
Cooler colors are softer layers of the snow
Hotter colors are harder layers of the snow
-Thickness of layers is just for relative comparison and does not have to be perfect
-For each weather situation, build a snowpack based on what you have learned
After building a snowpack decide as a group what your mindset would be for a day of touring:
-Avoid avalanche terrain – feeling sketchy.
-Limit exposure- there are safer places in the terrain, but also areas of danger.
-Step out cautiously – most areas are unlikely to hold avalanche danger but avalanche risk does exist.
And what is your major avalanche problem? (Recall the previous presentation)
First Weather Situation
-It’s been a slow start to the winter and there is just 4 inches of snow on the ground from early storms. The temperatures have been very cold through the fall. Just yesterday though, a huge storm rolled in and dumped 18 inches of snow with moderate winds.
Second Weather Situation
-It’s mid winter and there is a solid base of settled snow with not much variation. It has been super warm the last couple of days but cold weather arrives for a day followed by 2 inches of snow the next. After this small storm it stays very cold and dry for a week. After this dry period, a large snow storm moves through the area but with very little wind depositing 12 inches of storm snow.
Third Weather Situation
-It’s mid winter and it just snowed 8 inches on top of a relatively settled and uniform snowpack. Overnight, the wind blew 80 mph from the SW.
- What would the pack look like on the NE and E slopes?
- What would the pack look like on the SW and W slopes?
Back to Top | Back to AIARE 1 Classroom Activities
Human Factor
Kind of what it’s all about! How we as humans make decisions. These activities help students gain awareness over their own decision making processes and the language to be able to discuss heuristics together and come up with productive solutions.
FACETS and You
Provided by: Zack McGill
This activity is designed to get folks talking in their field groups about common heuristic traps and have them identify some that they are most susceptible to. It’s good to do this after talking about some of the common heuristic traps out there so that folks have a common language to refer to them by. Hopefully by talking about them before heading out into the field, they will be more on everyone’s radar and folks have the language to call out others when they see them coming into play. In this example I just used FACETS since that is a common acronym folks tend to use nowadays to help students remember them.
FACETS
Familiarity
Acceptance
Commitment
Expert Halo
Tracks on the slope
Scarcity – “Mad Pow”
You can get definitions of each of these HERE.
- Which of the human factor traps do you find the most dangerous?
- What human factor traps are you most susceptible to?
- How can you avoid letting them influence your decision making?
- What are some positive characteristics you look for in backcountry partners?
- Anyone have a good story of the human factor at play? Doesn’t need to be skiing related.
Relay Recall
Provided by: Eric Haskell
Half the world is composed of people who have something to say and can’t, and the other half
who have nothing to say and keep on saying it.
-Robert Frost
Often we attribute critical errors resulting in avalanche incidents to communication breakdowns; yet we spend the least amount of time practicing communication in staff training and avalanche courses compared with other skills.
Putting thoughts into words and having others understand exactly what you are trying to convey can be a hard to impossible task. Even when it is easy we often fail to communicate. Sharing our observations, our risk assessment and our plan is something that should come out seamlessly as professionals. It is something that most of us could improve upon. We should also teach recreationalists to communicate well. The basics of how to do this are well known yet get skipped in the field. Practice makes habit and what follows are some tools to practice.
These simple and effective tools were developed by the military. They have been adopted in healthcare and emergency services to avoid errors in dynamic high-risk environments where communication is critical – sounds familiar? Research has shown the use of these tools results in higher team performance and a dramatic decrease in patient errors in healthcare. They are easy to use and ensure all of the important information is conveyed. Two of these tools are SBAR and closed loop communication.
SBAR is an acronym that creates a template for organizing our thoughts and conveying them to our team.
Situation – What was observed? What is happening?
Background – What is the context?
Assessment – What is the relevance? How does this speak to stability?
Recommendation – What are we going to do about?
In addition to SBAR, closed loop communication creates a circuit that ensures our message has been transmitted without error. It involves call-outs and check-backs. A call-out is a message that is directed to a specific individual whom the message is relevant to or to the team, and calls for a response.
Call out: “Hand shears and test slopes are consistently showing clean, easy results on a surface hoar layer 30cm down. This seems to be at the interface of the last storm. Skier triggered slides will be easy to trigger and small to large in size from this layer. Let’s close Jerry’s Bowl and Poker Face and use caution on the small terrain features on Rolly Bowl.”
Check back: “You found surface hoar 30 cm down at the interface of last storm. It is producing clean, easy results and could result in small to large avalanches that are very sensitive. You want to close Jerry’s Bowl and Poker Face and exercise caution on Rolly Bowl. What about Ricki’s?”
These concepts are easy enough in theory but require practice to become habit. Here’s an activity to practice!
- Divide group into teams of four or more.
- The first team member has one minute to read Statement A and then must whisper, from memory, to participant # 2.
- #2 tells #3, #3 tells #4. At the end check for accuracy.
- Round two, the group uses call backs at each transmission before telling the next participant statement B.
- Compare the results. Discuss what other techniques would aid in accuracy such as a field book. Were the most important components of the message conveyed or lost in the details?
Statement A: “At 9700’ on an NE slope I found fist hard 1-2mm facets 87cm down, sandwiched between a pencil hard crust and 1 finger facets. The layer was reactive with moderate, sudden planar CT and ECTP21. This is the layer that failed on Mount Diamond’s east face yesterday, HS-N-R3-D3.”
Statement B: “Yesterday, two slides were observed on the west side of Buck’s Drainage. They were SS-AM-R2-D2 and SS-AS-R1-D1.5. Both slides failed on 6mm surface hoar buried 42 cm deep. If tonight’s forecast of 16 inches comes to fruition, this could step down to the widespread 3mm depth hoar layer that has been lingering since Oct. 28th.”
Human Factor Assignments
Provided by: William “Willie” Webster
At the end of day 1, I assign/ volunteer every student a human factor. On day two they share an example of how that human factor has affected their decision making. The example doesn’t need to be related to backcountry travel, but as a group we can come up with scenarios where it could. The stories are pretty amazing, and by day two the group is comfortable sharing some interesting and sometimes vulnerable stories.
Human Factor Madlibs
Provided by: Sara Boilen
A really nice culmination activity for assembling the group is to have students answer and then share their own Human Factor Madlibs.
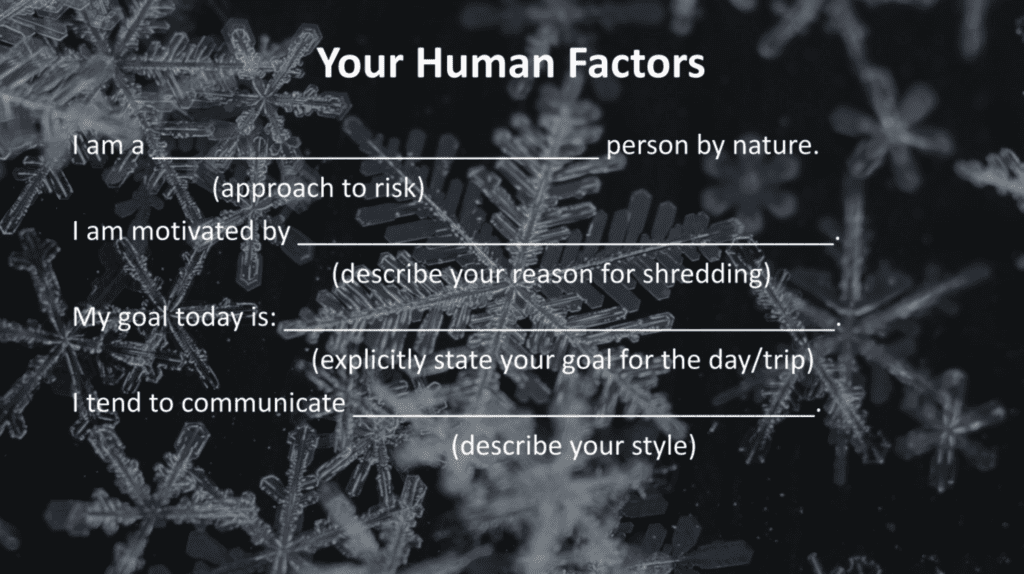
After students complete their Mad Libs:
- Have them look at Assemble Your Group Checklist and discuss what would be helpful/relevant from their Mad libs to communicate with their team members or be mindful of for themselves.
- If students have already done their Risk Tolerance Questionnaire, prompt them to add their realizations from that questionnaire to this conversation. You can find the Risk Tolerance Questionnaire under the Risk Tolerance heading below.
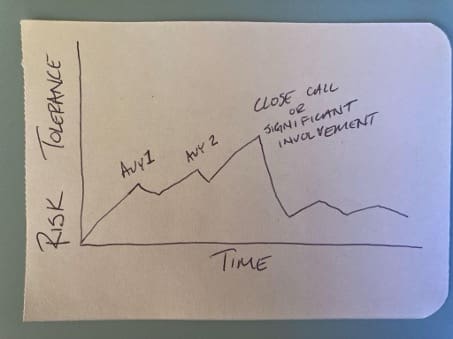
- After completing the Assemble Your Group Checklist conversation, highlight that personal motivations and risk tolerance change over time and can be influenced by many different factors on any given day, season or year.
- If time allows, draw a personal risk tolerance over time graph to illustrate how our goals, motivations and risk tolerance change over time:
- Highlight the importance of using checklists to combat human factors.
- Wrap up by encouraging folks to keep their Mad libs and revisit it over time and use as a tool to inform conversations with their partners.
Assemble Your Group Checklist – Real World Conversations
Provided by: Kenzie Carson
LEARNING OUTCOMES:
● Students will get an example of what conversations may look like working through the Assemble your Group Checklist
● Students will practice mock conversations with their peers to become more familiar with this process.
MATERIALS NEEDED: This slide deck. You have multiple options with this lesson, you could run through the slides if you’re running low on time or print them out as scripts and you and another instructor act out each part of the checklist.
INTRODUCTION:
This lesson is intended to give examples of what these bullet point prompts can look like in real conversations with your touring partners.
PRACTICE/ACTIVITY:
● Run through the slide deck
OR
● Print content of slide deck and have two instructors act out the the examples
● Split groups into 2-4
● Have students refer to Pg 2 for the prompts, each student takes a prompt and facilitates the conversation for that prompt. Ex student #1 has “Compatible Goals” What are some questions you will need to ask your partners to see if you have compatible goals?
● Can put these questions up on the whiteboard to help students come up with questions or ideas of how to have these conversations
○ What are your goals for today?
○ Given the avalanche forecast, what type of terrain are you comfortable with today?
○ Are you comfortable with honoring the most conservative voice once we’re in the mountains? And maintaining a pace where everyone can be included in conversations?
○ Given our objective and the conditions, what is the optimal number of folks for this tour?
○ How are you doing physically and mentally today? Anything that may be distracting for you?
Risk Tolerance Cards
Provided by: Sarah Ebright
LEARNING OUTCOMES:
-Increase understanding of components of risk and how they connect to managing risk with avalanches
-Increase individual awareness and self reflection of personal risk tolerance.
MATERIALS NEEDED: Risk Cards (below)
INTRO:
● Human beings are susceptible to many different forms of risk in our lives. If folks can remember their driver’s education, the instructor likey talked about the risk involved with operating a motor vehicle. Similarly, risk is often talked about in business and finance. If investors or business owners never engage with risk, there will likely be no or limited gains. Risk tolerance is the term used in most industries to define how much risk an individual, business, financial institution, etc is willing to take on. Often, the more risk X accepts, the more vulnerable X becomes to consequences.
● Go through this Slide Deck
● Notes for Slide Deck:
○ Seinfeld clip – is anyone a risk management expert?
○ Show of hands: What’s riskier? DRIVING, DRIVING YOUR CHILD, LIGHTNING STRIKE
○ The concept of risk is vague and not always intuitive. As humans, we don’t always look at situations logically, so we’re going to break it down.
○ The Risk Equation involves 4 things: let’s define each one… (shout it out!)
■ Probability – What are the chances something is going to happen?
■ Consequence – What would happen?
■ Vulnerability – How susceptible am I to the impacts of the hazard?
■ Exposure – How am I interacting with the hazard?
○ Let’s use the example of getting in an accident while driving:
■ Probability – Am I in Kathmandu or Three Forks?
■ Consequence – Are the vehicles going 15mph or 80mph?
■ Vulnerability – Am I driving a Dodge Ram 3500 or Smartcar?
■ Exposure – Am I driving in rush hour or at 3am?
PRACTICE/ACTIVITY:
● Have students group together in groups of 2-3
● Hand out cards with statements – categorize each. Find the cards here.
○ Probability
■ There’s a 30% chance of rain today
■ The ice on the skating pond is only 1/8” thick and it’s 45 degrees out
■ Only a quarter of all applicants get into Harvard
○ Consequence
■ Seafood causes me to break out in hives
■ Breaking your arm in a mountain bike crash
■ Topping my rain boots in the river
○ Vulnerability
■ My car doesn’t have snow tires on yet
■ Wearing a sunshirt and long pants on a sunny day
■ I forgot to bring my cup to my hockey game
○ Exposure
■ Working from home today instead of driving on icy roads
■ Sticking to in-bounds ski terrain
■ Drinking only bottled water in Mexico
● Can you chat in small groups and come up with an example of Probability, Consequence, Vulnerability, and Exposure in an avalanche context? (Hint, check out the Risk Management Framework on page 1 of your blue book)
● So in terms of avalanche terrain, what do we have control over?
○ Vulnerability and Exposure
● How do we limit our vulnerability and exposure? Using the Risk Management Framework in the blue book!
○ How to reduce vulnerability
■ Wear beacon, shovel, probe
■ Wear an airbag
■ Wear a helmet
■ Limit exposure
○ How to limit exposure
■ Choosing the right terrain
■ Avoiding being above terrain traps
● Optional: Show personal risk tolerance over time graph.
● Takeaway:
○ Start thinking about personal risk tolerance and whether your choices are in alignment with your stated risk tolerance.
○ Reading and reviewing case studies or accident reports and connecting emotionally with other people’s accidents can help us learn without having to make a costly mistake ourselves.
● What questions do you have?
Backcountry Ski Risk Tolerance Questionnaire
Provided by: Jediah Porter. Adapted by: Kenzie Carson
NOTE: This activity can be used in conjunction with the Sara Boilen Mad Libs activity. I recommend you start with this questionnaire when teaching Risk Management / Risk Tolerance and incorporate the learnings gleaned from this questionnaire when introducing Mad Libs during the Teamwork/Assemble Your Group Lessons.
LEARNING OUTCOMES:
-Increase individual awareness and self reflection of personal risk tolerance.
MATERIALS NEEDED:
Questions listed below. Could put up a projector or print out so each student has a copy to take with them.
INTRO:
● Human beings are susceptible to many different forms of risk in our lives. If folks can remember their driver’s education, the instructor likey talked about the risk involved with operating a motor vehicle. “77% of motorists in the US have been in at least one accident in their lifetime.” Many accept this risk because the reward or travel, getting to school, work, etc is great. Similarly, risk is often talked about in business and finance. If investors or business owners never engage with risk, there will likely be no or limited gains. Often, the more risk X accepts, the more vulnerable X becomes to consequences.
“Risks and rewards are intertwined, to put it mildly. When the reward is great(sic), what are you willing to put on the line?”
-Jediah Porter
● Can use this graph to refresh previous learning:
● Speak to how to lower likelihood of getting buried (risk tx = airbag) and how to lower likelihood of consequence of getting buried; risk tx = carrying B/S/P and practicing rescue with your team often.
● In the Assemble Your Group section of pg 2 of the blue book it prompts you to discuss your risk tolerance. This activity is designed to help you gain clarity of your personal risk tolerance to help inform this valuable conversation with your peers, partners and family.
PRACTICE/ACTIVITY:
– Give copies of printed out questionnaire to each student or put questionnaire on projector
– Have each student fill out questionnaire individually:
Backcountry Ski Risk Tolerance Questionnaire
- In general, how would your best friend describe your recreational risk taking tendencies?
○ A go-getter
○ Willing to shoulder some risk with research
○ Cautious
○ Risk avoider
- You have professional level guidance and information, but total freedom to choose where you go. In any situation, an avalanche has a 15% chance of badly injuring you and a 10% chance of killing you. What would you pick?
○ Crusty, horrible snow that absolutely will not avalanche.
○ Smooth hard snow that has a 5% chance of avalanching.
○ Boot-top powder that has a 15% chance of avalanching.
○ Movie-worthy face shots with a 25% chance of avalanching.
- When you think of the word “risk” which of the following words comes to mind first?
○ Loss
○ Uncertainty
○ Opportunity
○ Thrill
- You are packing for a day in the mountains. Your backpack is nearly full. Do you (and you can only fit one):
○ Bring another liter of water and ski an extra run
○ Bring your emergency shelter in case something bad happens
○ Bring the bigger camera to better capture the experience
○ Bring a seat cushion and a thermos of tea for an hour of summit serenity
- It is day 9 of your 12 day expedition to Peak XYZ. You stand on the summit with three descent options. Any one of the choices will take the remainder of your time on this long-anticipated dream trip. Which do you choose?
○ Your ascent route. With wind-scoured conditions, boot tracks, and a line of others ascending. Little to no avalanche hazard and minimal slip and fall hazard.
○ The 35 degree powder couloir with minimal slip and fall hazard and about a 5% chance of a really bad avalanche.
○ The 50 degree “money line” with perfect snow, certain death if you fall, and about a 5% chance of a really bad avalanche.
- Mountaineers, on foot, rope up for nearly all glacier travel. The rope reduces or eliminates the consequences of a fall into an unseen crevasse. In the exact same conditions and terrain, ski mountaineers rarely descend roped together. A crevasse fall is slightly less likely on skis than on foot, but the consequences of an unroped fall into an unseen crevasse are dire.
○ “Going onto glaciers at all is preposterous”
○ “It is a cool-looking environment. I could see going there, but taking all the precautions, regardless of my mode of travel”.
○ “Skiing downhill roped to my buddy seems annoying, but better than the alternative”.
○ “I need a damn good reason to compromise the enjoyment of my skiing. I’ll gladly ski unroped on those glaciers”.
- Each morning you get an emailed avalanche advisory and a screen full of ski stoke. Today is your day to shred. The advisory says that, on your favorite type of terrain, human triggered avalanches are possible. Reports indicate that your favorite type of terrain will be untracked, sunny, and perfect snow. Do you?
○ Stay home
○ Go to less enjoyable but lower likelihood terrain
○ “Possible” isn’t “for sure”. Go to that untracked, sunny, perfect spot.
- You most admire/seek to emulate/wish to be:
○ The 75 year old you’ve never heard of that has ridden the same “Hippie Trees” for 50 years
○ The 40 year old quiet crusher that has 20 years of perfect snow, an occasional expedition, and a handful of close calls
○ The 30 year old magazine star with a dozen first descents, roving and growing resume of amazing imagery and experiences, a deceased close ski partner, and annual (or more) big mountain incidents/close calls.
● After folks have finished, draw a personal risk tolerance over time graph on a whiteboard to illustrate that risk tolerance is not stagnant and may change over time and experience. ADD into bluebook Pg2: What is your risk tolerance today?
● On the same piece of paper as the questionnaire, have students draw their current risk tolerance over time graph.
○ Where are you at right now in your Backcountry schralping experience?
○ Do you think your backcountry actions are in alignment with your stated risk tolerance?
○ Take this paper with you, consider storing it in your bluebook to guide conversations with partners and return to the questionnaire to help you recalibrate your understanding of your risk tolerance as it changes over time.
Powder Arousal Activity
Provided by: Zack McGill
If you haven’t gone through a deep dive of the White Heat Project… treat yourself. Thanks for sharing this with me, Jules! It’s all geared towards understanding why folks make risky decisions in the backcountry. One point of research you’ll find there is where researchers compare sexual risk taking to backcountry powder skiing. You can watch a short video on what they coin “powder arousal” HERE as it is the impetus for this activity.
Have students answer these questions on a scale of 1 to 7 where 1 is Absolutely not and 7 is Yes, absolutely:
- Would you…
- feel frustrated if your ski partner is scared and refuses to ski an out of bounds run that you want to ski?
- try to persuade a ski partner to ski an out of bounds run that you want to ski is he/she is nervous and says no?
- leave your partner out of bounds to go ski a run if he or she is nervous and says no?
2. It’s a blower pow day. Can you imagine riding in the backcountry…
- if you forgot your avalanche beacon but the danger was moderate?
- with someone else who forgot their avalanche beacon but the danger was moderate?
- alone with the appropriate avalanche gear when the avalanche danger is moderate?
- with a partner who’s backcountry travel skills are unknown to you when the avalanche danger is considerable?
- with a partner with the appropriate avalanche gear including avalanche backpack when the avalanche danger is high?
After folks work their way through the sheet, ask if anyone put over a 4 for any of the questions. Likely the answer is no, but could lead to some good discussion if someone actually does.
3. Ask the class how they think their numbers would change if they weren’t sitting here in an avalanche class but were standing at the top of a lift line on a beautiful powder day and they were faced with the same questions?
Introduce the term “Powder Arousal” and have them watch from 4:44-6:44 in the Powder Arousal Video. Use this discussion to segue into your presentation on how humans make decisions and common heuristic traps.
Back to Top | Back to AIARE 1 Classroom Activities
Avalanche Terrain
These activities are designed to get students engaging with avalanche terrain. From simply identifying avalanche terrain, to actually figuring out the best ways to move through it based on conditions, these are some of the most important lessons we can give to students.
Avalanche Terrain ID Activity
Provided by: Zack McGill
This activity is designed to get folks immediately putting into practice what they learned during the avalanche terrain lesson. It has students look at photos of terrain in their venue (you’ll see that the photos provided are from the Baker Backcountry but you can just insert your own) and then think critically about what hazards are present and how they would move through that terrain. The activity is great for in person as well as online classroom. Descriptions of both are below.
Activity Description for Online Classroom:
Choose Speaker (Person responsible for presenting findings to large group). That person shares screen and opens up ONE of the terrain photos from HERE. Or wherever your venue is.
As a crew:
- Put stamps on at least three trigger points.
- Draw an up-track that most keeps you out of avalanche terrain.
- Circle at least three terrain traps.
- Speaker takes screenshot.
- Share with whole group once back.
Activity Description for In-Person Classroom:
For in person classroom, it’s great to have a terrain photo with corresponding Topo map with slope angle shading to that terrain printed back to back and laminated. This way, folks can use dry erase markers to complete the same steps as above.
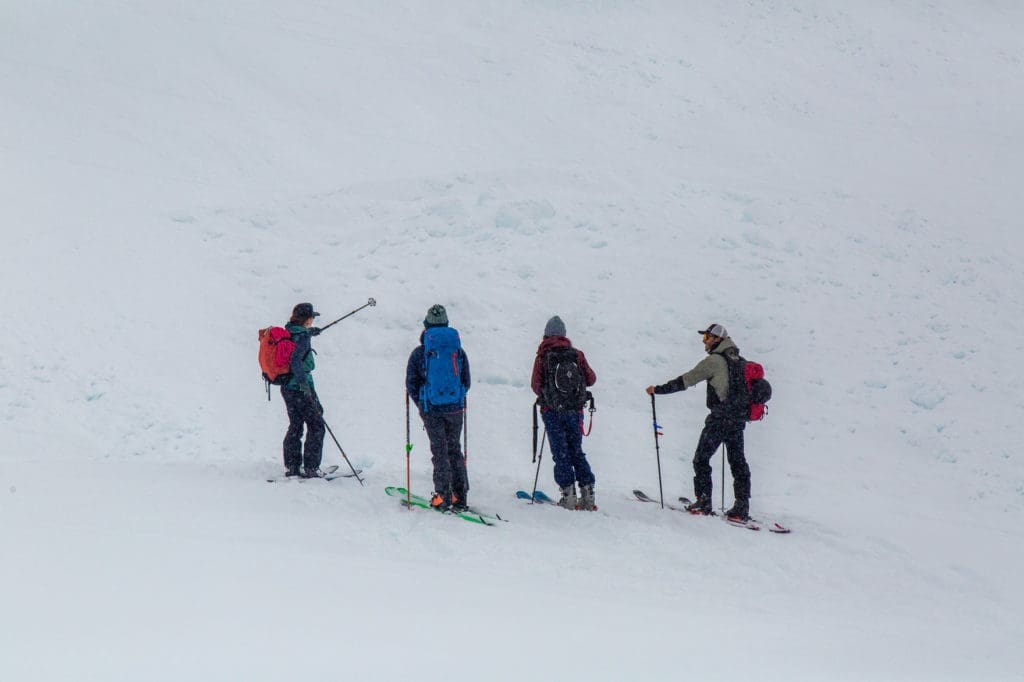
Route FInding Exercises
Provided by: John Barkhausen
Useful for either in-person, online, or a link for continuing education after course is the Avalanche Canada Route Finding Exercises: HERE.
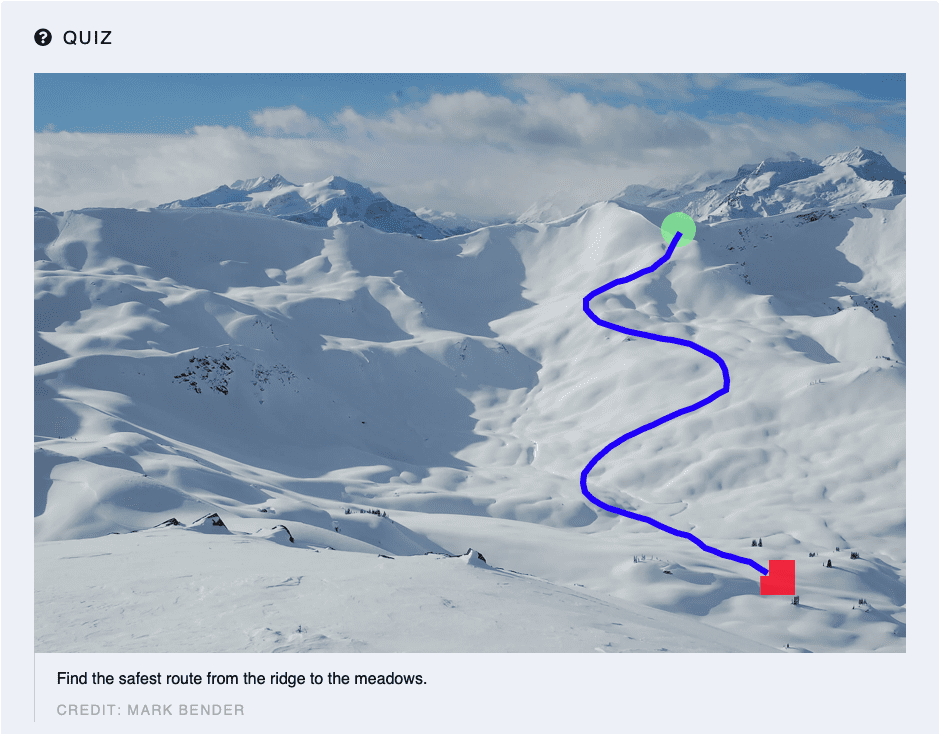
You can have students take turns trying to find their way through the terrain utilizing the safest route and avoiding avalanche terrain. There are multiple right answers for every terrain photo and so many wrong ones! If students do enter avalanche terrain, helpful hints as to why are shown.
THE TERRAIN CONTRACT
Provided by: Anne St. Clair

Observations and Decision Making
Provided by: Eric Haskell
- Divide group into small groups of four to five.
- Each group is provided with a map of the terrain they will be “traveling” through with four routes on it and a set of cards (enough for each participant to have five to six cards.)
- All routes travel through avalanche terrain – complexity of terrain should be matched with appropriate challenge of group.
- On each card is a clue pertaining to parts of the avalanche forecast, weather forecast, recent field observations, group equipment and team components (such as who is part of the team and who is hung over.)
- Conditions should coincide with a moderate hazard rating with weather pushing to considerable as the team is in the field.
- The cards will be evenly distributed. Each participant can read their cards and only their cards.
- After being briefed of the situation and reading their cards, the participants will have 15 minutes to discuss the routes and rank them from least hazardous to most hazardous based on current conditions.
- Participants cannot read from their cards; they can only share the clues from memory.
- While the group is sharing their clues a powerpoint will be playing in the background with additional clues – updated weather forecast, updated field observations from the group as they travel through terrain and photos of observations they would see.
- At the end of the session, compare rankings of the different groups and discuss the correct answer, checking to see if any clues were missed. Discuss how clues are missed while in the real world, especially due to communication breakdown.
Back to Top | Back to AIARE 1 Classroom Activities
Level 1 Field
This section goes into some activities and suggestions for the Level 1 field days. You’ll want to mix and match activities to ensure that folks aren’t standing around too much — especially if it’s stormy or cold out.
Avalanche Rescue | Ride Safely | Tour Day | Snowpit | Debrief
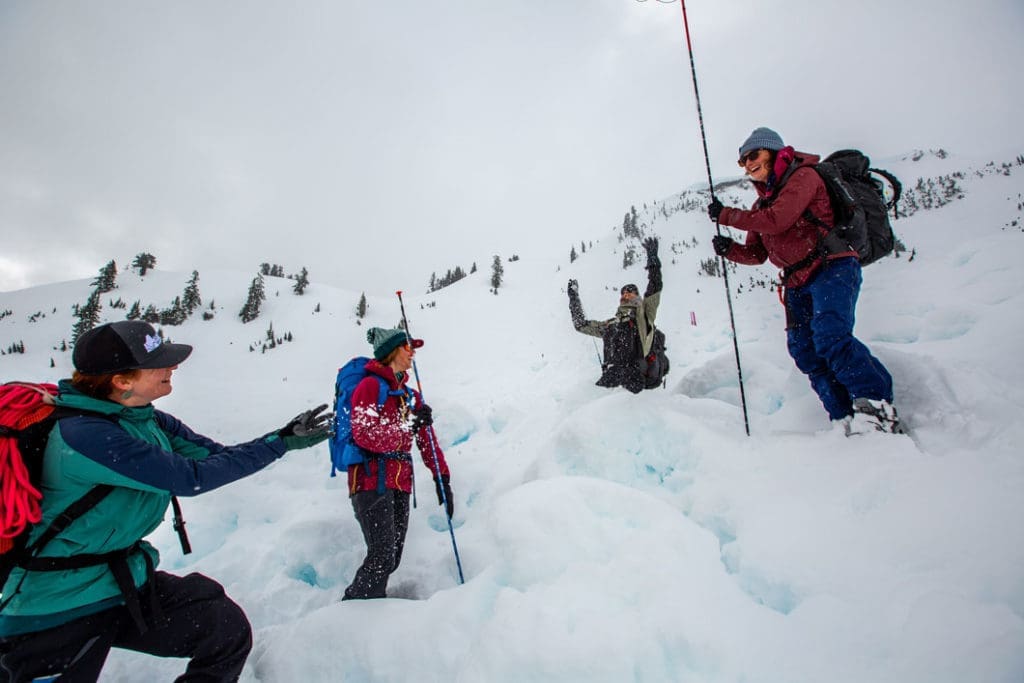
Avalanche Rescue
Typically, avalanche rescue is first on the agenda for your field day. Here are a few activities to get folks going on avalanche rescue.
SHovel Drill Activity
Provided by: Julie Ann Holder
Have students practice strategic shoveling with a twist! Ask them how many people they typically ride with. Whatever they tell you is their most common group size is the number of people they get to dig with.
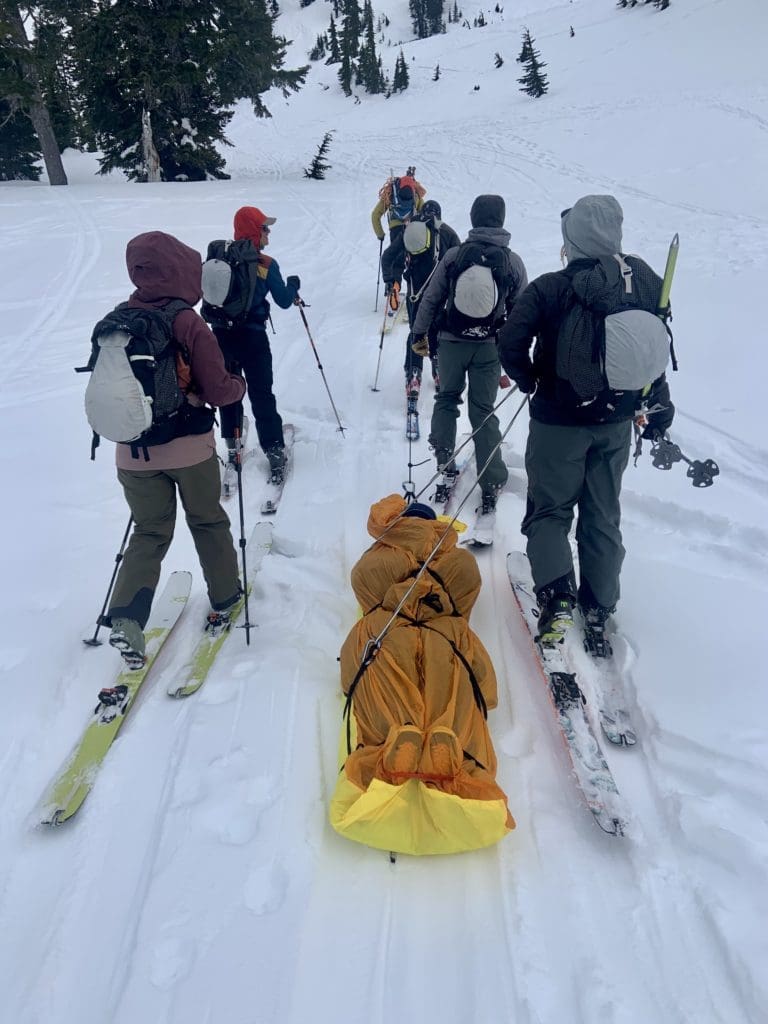
- Students dig down 1-1.5 meters to about the average burial depth in an avalanche while being timed by the instructor. Offer little to know feedback on form unless students are shoveling in a way that will hurt themselves or others.
- After everyone finishes, talk through the times and link to how long folks have under the snow before they die of asphyxiation. This should drive home that getting caught in an avalanche isn’t awesome and the likelihood of being able to rescue someone caught in a big avalanche successfully is tough.
- Segway this talk into a discussion on best group size.
If you want some ideas on strategic shoveling techniques, check out this Strategic Shoveling Techniques resource.
This or That? Strategic Shoveling
Provided by: Devon Schoos
To begin to teach strategic shoveling to students, you can establish the importance of being strategic by demoing two different methods for shoveling and then ask, “which is better? This? Or that?
Examples of things to show:
- Shoveling standing up (this) shoveling from knees (that)
- Shoveling with shovel handle collapsed (this) shoveling with shovel handle extended (that)
- Chopping and mopping (this) only mopping (that)
- Shovel in hoe mode (this) shovel in standard assembly (that)
- Shoveling slowly (this) shoveling quickly (that)
- Digging directly on top of the probe (this) one step downhill (that)
You can also make it more engaging by getting two student volunteers to demo the methods with you telling them what to do at two different stations and the rest of the folks saying which method they think is better.
Provided by: Zack McGill
Probe and Shovels Race
Provided by: Zack McGill
At the trailhead during your trailhead check, you’ll need to get eyes on everyone’s avalanche safety gear anyway, so this activity is perfect for not only checking that box, but getting folks moving and getting acquainted with their gear.
- Have folks fully strapped in ready to tour with backpacks on.
- Tell them that on the count of 3, they will need to drop their packs, get out their probe and shovel, fully deploy each, and put them in the snow in front of themselves. They will be timed.
- After folks figure it out (feel free to stop some folks early if they can’t figure out how to put together their probe) talk about differences in probes and shovels and demonstrate how to deploy both efficiently. Make sure to talk about backcountry touring specific backpacks and the importance of storage of probes and shovels inside backpacks and not on the outside! Oh… and tell them to leave those probe bags at home!
SHOVELING IN THE MODERN ERA
Provided by: Alexis Alloway
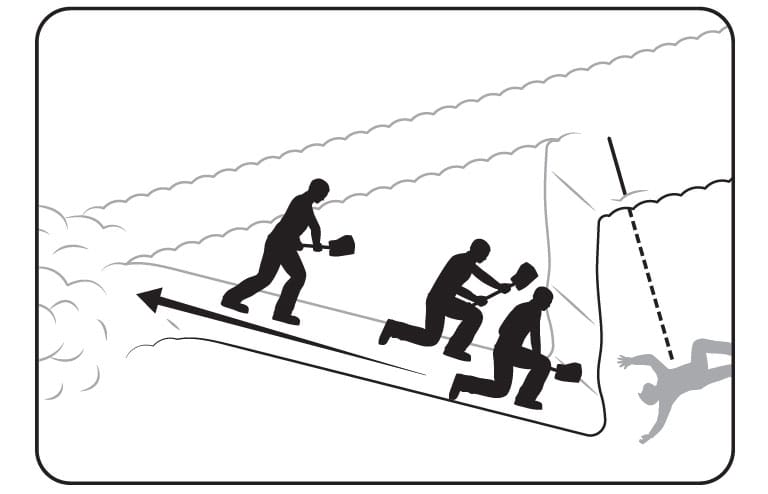
After hammering on the need for a “Shovel Master” to take charge of the operation and give clear, concise instructions, I’ll use an acronym to help highlight the important concepts of shoveling in a memorable framework. I love the ABCD acronym that Bruce Edgerly first presented with strategic shoveling years ago. Here is how I’ve updated his original ABCD to reflect current best practices.
I want to teach a technique that works whether you are a solo rescuer or whether you have six people available to shovel.
A. AIRWAY – STAY OFF IT!
Get downhill of the probe strike and don’t collapse the air pocket by walking on top of the snow there the probe strike is.
B. Begin close to the probe.
The number one thing I took home from ISSW this year is that we do NOT want to start shoveling 1.5-2x the probe depth away from the probe. The latest research has shown that if you start from 1.5x the probe depth away, it will increase the excavation time to reach the airway by 2.5 minutes on average (decreasing survivability by 7%). Dig close! How close? For every meter of burial depth, position the lead shoveler one “normal” (not “giant”) step downhill of the probe.
C. Clear to the sides, then Conveyor.
As someone who has dug A LOT of deep holes in the snow, I cannot emphasize enough the importance of clearing to the sides first so that you don’t get walled in behind you and so that you maximize the number of snow blocks that must be shoveled only one time. However, at some point it becomes difficult to shovel to the sides, and if you still have snow to clear, that’s when you are going to have to conveyor that snow behind you. When shoveling in a team, be sure to loudly announce “Conveyor!” when you switch so that people behind you are ready for blocks of snow to suddenly start coming their way.
D. Dig fast.
We want to highlight the need to dig as fast as you can sustain. Maximum effort will burn most people out very quickly, so I tell people to aim for around 70% of their maximum effort.
E. Exchange positions.
Rotations definitely help the people in front get a break. I’ve seen that rotating every one to two minutes is pretty realistic. Your Shovel Master can announce the rotations (and it’s very important they instruct people on how to reposition each time before you start shoveling).
Once I have gone over these big-picture ABCDE principles with my students, the next thing to address is shoveler positioning. If I have more than one shoveler, I strongly prefer to put two people side-by-side up front near the probe. There are two reasons for this.
First, having two people up front means that we are likely to get to the airway faster. If there is only one person up front and they discover a foot while excavating, it’s now going to take some time to get to the head, whereas if there is someone next to them you have more margin to adapt and get to the head quicker.
Secondly, once I get to an airway, I need a workable platform in the snow in order to pull that person out and clear their airway and begin CPR. I’m going to get to that workable platform much faster if we started with two shovelers up front rather than one.
Probe Technique
Provided by: Zack McGill
Students have a hard time with probing, so a demonstration of why it’s important is prudent before setting them loose to practice on their own.
- Point folks to the diagram in the field book showing good probing technique:
- Then have a student lie down in the snow (as long as it’s not too stormy, use a backpack if folks are cold).
- Stand over them with a probe and show how even the slightest difference in angle at the surface causes problems in deep burials as you can miss the buried human even if keeping to the spiral pattern.
The Art of Probing
Provided by: Karin Pocock. Adapted by: Kenzie Carson
Note:
This activity can be used as a way to teach probing or as a course correction for ineffective probing.
Set Up:
-Gather students together and demonstrate how to mark out a 1m x 1m x 1m x 1m box with a probe in an undisturbed patch of snow.
-Have each student find an undisturbed patch of snow to mark out their own box
-Tell students they will have an undisclosed amount of time to probe from the center of their square out to the edges. The goal is to make their probe strike holes as precise, perfect and even pretty as they can. At the end we’ll go on an art walk and decide which box looks the best!
Practice:
–Set a timer for 1 min, don’t tell students they only have 1 min.
-Stop them after 1 min, walk around and discuss with students what was hard or easy about the goals of a “perfect box,” see who was able to probe the whole box. (Many students will successfully probe 1m box in 1min)
-Use this as an example that taking your time to do precise, methodical probing will save time.
– Have someone lay in one of the boxes that didn’t successfully make it to the edges and demonstrate that even if you don’t cover 1m2 per 1 min, you will likely still get a positive strike.
Components of Rescue – “Work it Backwards”
Provided by: Chris Pruden
Intro:
-Break students into rescue teams, ideally 2-3 folks per team.
-Discuss how rescue scenarios are not representative of real-world scenarios: We’re not navigating a crown, bed surface that may be full of rocks, dirt, trees, rocks, it is often hard to bury transceivers far enough away to thoroughly practice course search….
-Another key component of rescue to remember is that beacons find other beacons or really bring you close to another beacon, the probe is what actually finds the victim and shoveling is what allows this person to begin breathing again, which is the ULTIMATE goal of rescue.
-As such, we will break each step of rescue down and practice each component starting with the most valuable tool – shoveling.
Shoveling
Place a probe 1-1.5 meters deep and instruct your team to work together to get to the tip of the probe as fast as they can!
-Can set this up as shovel races for each team
-Makes sure folks are communicating and rotating
-If time allows, have teams debrief what worked well for them and what could help them be more efficient. Bury another probe and see if they can reduce their time.
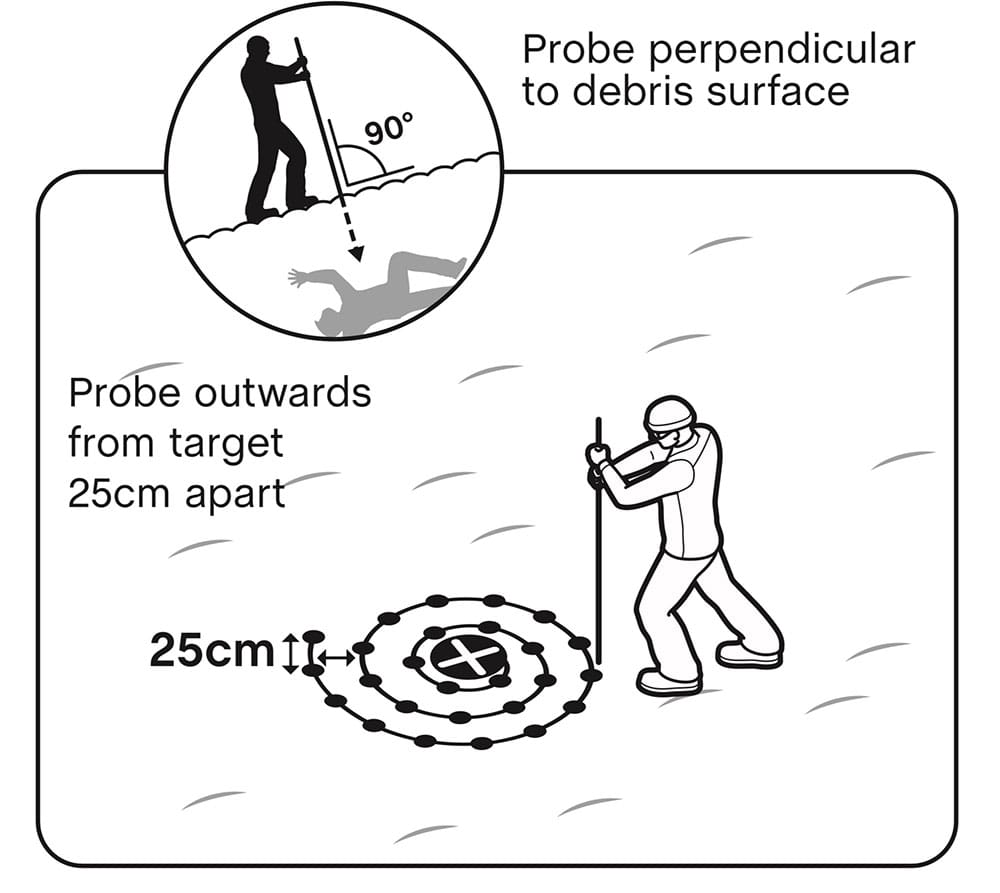
Probing
Next describe components of effective probing:
● Perpendicular to the slope
● Spiral or box configuration aprox 20cm apart or about a boot-length
● Remember to move your feet as you probe to maintain perpendicular angle as your spiral or box increases in size
● Hold probe with both hands and use it to feel what you’re hitting – remember not to give so much force that you break your probe or harm the victim.
● How to tell if it’s a positive strive? Will have more of a soft, bounce or squish feel to it, probe may not sink as deeply into debris.
● LEAVE PROBE IN! Once you get a positive strike
-Demonstrate:
Slow, methodical probing in spiral or box shape with two hands and moving your feet.
Have each student do this, walk around and give feedback on movements or technique.
Fine Search
-Bury a beacon
-Demonstrate and talk through key pieces of fine search:
● Keep beacon in same orientation on XYZ axis (right, left, up, down) Only change one variable at a time.
● Slow is smooth, smooth is fast – allow for the processor to keep up with your movements!
● Make numbers go down as you work your X,Y boxes.
○ Make sure you are thoroughly checking all up, down, right, left areas before
moving on!
● Can use ski poles to mark your high readings to keep you on track
● Mark your lowest reading to start probing
Have students practice fine search in their teams – give each other feedback
Following Signal
-Refresh on flux lines, beacon will likely bring you in on an arc
-Make the numbers go down! If they’re going up, stop, turn 180 deg in place, see if numbers go down again.
-Call out your numbers and be on the lookout for clues
-Demonstrate following a signal then have folks practice in their teams
Course Search
-Discuss each beacon has different ranges. At about 50-70m is when most transceivers will start to get a signal.
-Demonstrate acquiring a signal.
-Have students practice acquiring a signal
Put it all together!
Do a scenario following a rescue card.
Flux Line Demo
Provided by: Zack McGill
It’s important for folks to understand that they’ll be coming in on a curve most the time when following a signal with their beacon and to not expect to walk in a straight line. This activity will help demonstrate that.
- Find a large (at least 30m wide) open area that is mostly flat and snow covered.
- Have students follow you around in a large circle having individual students stop in the skin track every 15-20′ so after you’ve gone around once, students are evenly spread around the large circle.
- Walk to the center of the circle and instruct everyone to get out their beacons.
- Have students go to search and acquire your signal.
- Go around and have students shout out their numbers.
- Change the orientation of your beacon (for example hold it pointing up or vertically if you’d been holding it horizontally before).
- Have students shout out their new numbers.
- Change the orientation of your beacon once more and have them shout out numbers one more time.
- Go back to holding your beacon like you did to start and instruct the students to follow the signal into you while only going where the arrows tell them to go (only paying attention to their beacon.)
- After getting into you, have everyone take a few steps back to make a smaller circle and hold a discussion on what just occurred. Most folks will likely travel in an arc to reach you where some might have walked straight to you.
- Find a clean patch of snow and draw the 2D representation of Flux Lines on the snow and talk about why they traveled in a curve.
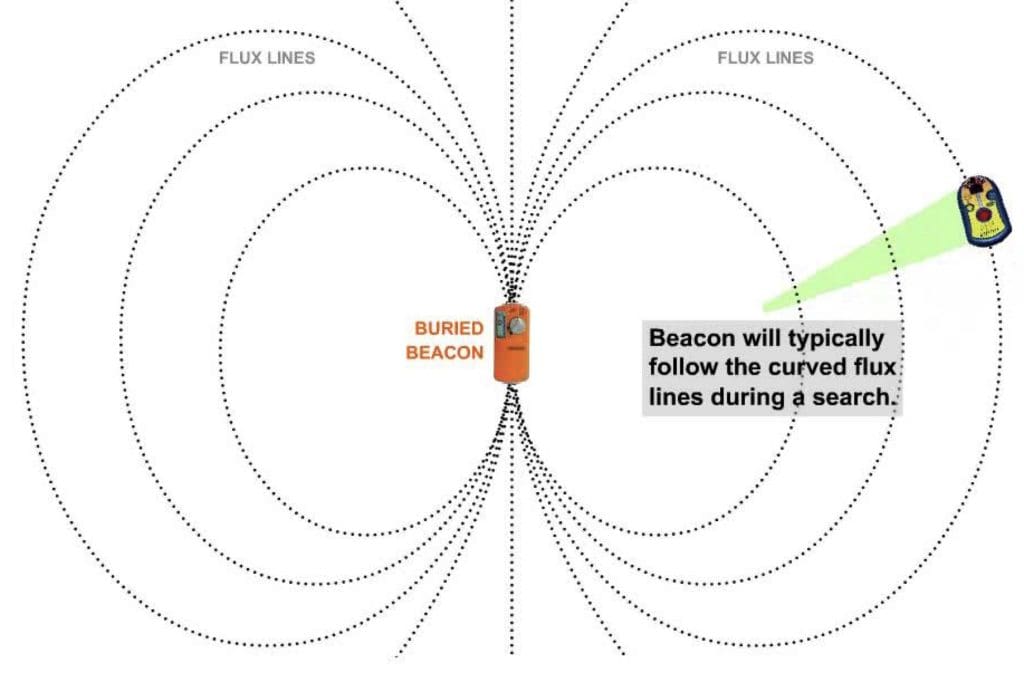
Make sure to talk about what it means if you’re following a signal in and the numbers get bigger! You’re taking the long way home. Flip 180 degrees and take the short way.
Back to Top | Back to AIARE 1 Field Activities
RIDE SAFELY
Here’s some activities and general tips in the Ride Safely category as you move from one place to another. It’s easy, especially when the weather is foul, to just put your head down and try and get from point A to Point B as quickly as possible. Hopefully some of these activities will help you slow down and remember that you’re always in some part of the ride safely flow once you enter the field: Monitor Conditions, Check in with the Group, Recognize Avalanche Terrain, and Use Terrain to Reduce Your Risk.
General Tips for Monitoring Conditions
Provided by: Zack McGill
Getting students to to understand what makes quality avalanche, snowpack, and weather observations is supremely important. Below are some ways to engage folks in making quality observations.
- Carry a few different tools for measuring slope angle to pass out to students (compass with sighting mirror, clinometer, phone with app, pole clinometer, etc.). Stop regularly to measure slope angle of different slopes in profile, from the top, and the bottom to being to train the eye.
- Assign 1-2 people at each transition to make either avalanche, snowpack, or weather observations as the crew moves along to share at the next break. This helps keep folks looking up and making observations rather than just watching the tales of the person in front of them.
- Use the A+O resource to keep students focused on the right things!
- Look for small test slopes that can yield results and target the given avalanche problem for the day.
- Remember that observing other groups of humans and what they are doing can be important learnings too. Don’t be afraid to use other groups (tactfully) to have discussions around decision making.
Downhill Checklist
Provided by: Kenzie Carson
The goal of this activity is to give students a tool to guide conversations with team members to discuss downhill travel techniques to limit exposure, build consensus and clarity of the downhill route.
- Can print the below cards and give out to students
- Have a student volunteer lead this conversation at each transition
After transitioning from uphill mode to downhill run through this checklist:
| Downhill Checklist 1. Do we have a large enough margin to avalanches and other hazards? 2. What happens if there is an avalanche? Any terrain traps below? 3. Where we go? – What’s our route? Where are we stopping? Anywhere we SHOULDN’T stop? 4. How we go? – One at a time, all together, spaced out? Will we lose visibility or comms with each other? If so, what’s the plan? 5. When we go? – Any one not ready? Be sure to GO when we agreed. |
Practicing Conversations About Risk Assessment Activity
Provided by: Eric Haskell
The goal of this exercise is to build the habit of discussing risk into our practice and work on
communication skills, not hazard assessment. Aim to get lots of repetition in as opposed to
drawing out discussions.
Clearly discussion is important and takes time, but this exercise is more geared to building a foundational process for effective communication.
In the field, find a slope that can be broken down into numerous pitches. The terrain and
snowpack should be of acceptable risk prior to exercise. Descend the slope, stopping and
having a discussion atop each pitch. Alternate leader at the top of each pitch. Leader facilitates
discussion:
- Is this slope capable of avalanching? Based on slope angle and slab characteristics
- What would an avalanche look like on this slope? Boundaries? Runout?
- What would the consequences of being in an avalanche be on this slope? Size of
avalanche? Terrain traps? - What is the likelihood of an avalanche? Relate avalanche problem, sensitivity and
slope characteristics to individual slope - How confident are we in our assessment?
- What are we going to do about it? Alternatives? Risk tolerance? Travel techniques?
Margin of error? Group consensus? Spotter location? Regroup location? - Enact Plan
Back to Top | Back to AIARE 1 Field Activities
Tour Day
This is the day that students get to put all the information you’ve been blasting at them together to practice putting a tour plan into practice. Here’s some activities specific to the tour day.
Assign Group Roles
Provided by: Zack McGill
It can be beneficial to provide a lot of structure on the tour day. I don’t always use every one of these roles, but I think it’s nice to have folks cycle through being the lead at the least and feel what it’s like in the driver’s seat.
- Assign someone to be the devil’s advocate and always be the contrarian to ask why even if the rest of the group is wanting to go a certain direction.
- Assign someone to be the Trap Lookout. Their job is to think about decisions the group is discussing and call out any possible heuristic traps that might be in play.
- Start off leading to set the tone and demonstrate pacing but quickly transition to having students take turns in the lead where appropriate and provide mentorship and feedback.
- Assign three students to make observations (avalanche, snowpack, and weather) as the group moves through terrain.
- Swap roles throughout the day.
Tour Day Tour Plan Activity
Provided by: Zack McGill
The most important step in having a successful tour day in my eyes is to go through a thorough tour planning session the night before heading out into the field, not just doing a quick one in the parking lot immediately before you head out where it may be snowing, windy, and unpleasant.
This is pretty simple in the PNW where the avalanche forecast comes out at 6PM the night before, but other folks may have to wait and do it in the AM. If that’s you, then try to do it in a comfortable place where you don’t feel rushed!
Here’s the activity description:
- After the debrief of the day on the first field day, establish a time to meet up with the squad to tour plan. Here in Washington, I typically go for 7PM so folks have time to get a shower and eat.
- Give them the homework of filling out the Anticipate the Hazard section of their field book with the help of the weather and avalanche forecast. Then ask them to complete a run list and then come up with a tour plan appropriate for the group and conditions to share at the meeting.
- For the meeting, I typically use Zoom and try to not go over 45 minutes. First off in the Assemble Your Group section, I check in with the group to see how people are doing. Any gear issues? Bodies feeling good? Then I like to ask them to tell me their main goal(s) for the tour day. I write these down to reference throughout the tour day and ensure we hit them all.
- Run through the weather an avalanche advisory efficiently. If they did a good job on this, it should just be reading it off so that everyone is on the same page.
- Move into planning the route. For framing, it’s nice to bring it back to basics: we’re looking for terrain with the best snow for the day, that avoids avalanches, and is appropriate for the group and our goals. You can even draw a Venn diagram of those three things using the whiteboard feature on zoom and then put hearts stamps in the center for terrain selection to really drive this home.
- Before hearing what they came up for tour plans, make sure to go through the run list for your area and open and close terrain.
- After going through the run list, then hear from folks what they came up with for tour plans.
- Spend the remainder of the time helping them narrow in on a tour that has a ton of options from the run list open to them. I usually frame it this way: if everything goes perfectly, what’s the furthest point you’d like to get to that’s open to us? That is our Plan A. Then work backwards from there to other things on the run list that are open all the way back to the vehicle.
Back to Top | Back to AIARE 1 Field Activities
SnowPack
This is likely your AIARE 1 students’ first time actually seeing a well crafted snow pit and intentionally engaging with the snowpack. This is your chance to model for them how to do it well, correct misconceptions around why we dig snow pits, and set them up for success going forward. Here’s some activities to help you along that path!
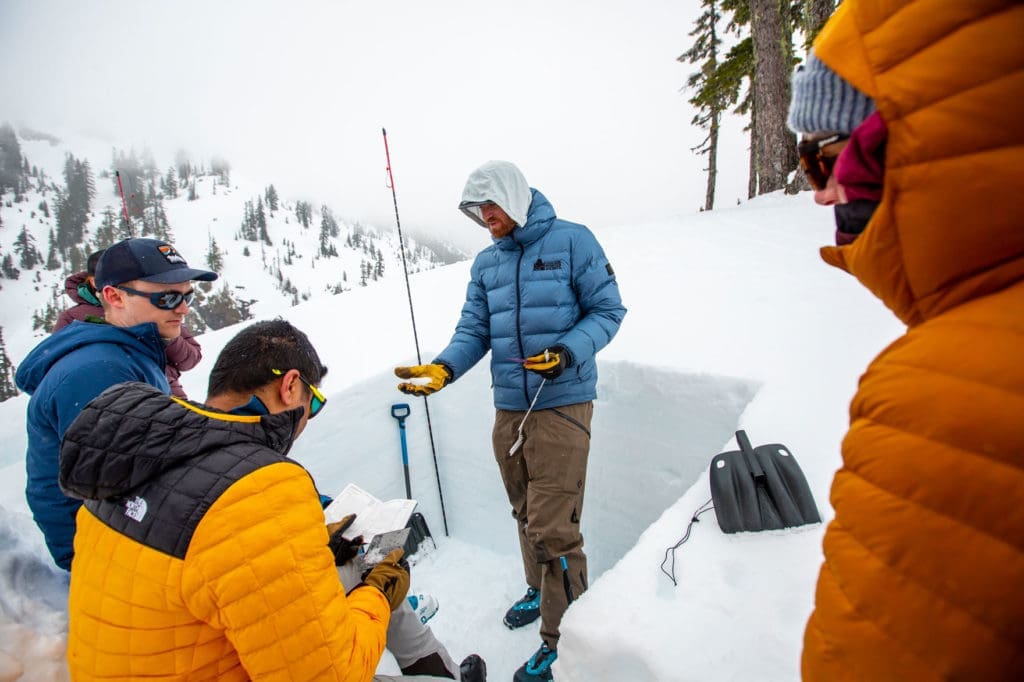
The Tool Box Approach Activity
Provided by: Zack McGill
This is my general process for snowpits. As always, there’s tons of room for differentiating based on the crew, the weather, and the experience level of folks. For a level 2 course, before heading into the field, I provide students with a digital PDF to save on their phone, or a physical card of the Toolbox Approach. I also carry a few laminated copies in my snow science kit to pass around to folks. I use this card as a scaffold to guide folks through snowpack obs.
For AIARE 1, I typically only use the Field Book and don’t mention the tool box approach at all, just do the process as laid out in the book. In addition, while I may do more demonstration in the level 1 and giving of answers/explaining. I ask prompting questions more in the level 2 and have students jump in and demonstrate things more if they’re able (like have them cut a CT instead of me). If they completely blow it and don’t do a good job or send it, both work well for learning.
- Where we dig snowpits.
- Safe location (not avalanche terrain).
- Representative Slope.
- Aspect (sun and wind).
- Elevation.
- Away from trees/tracks.
- Be as far away from trees as they are tall.
- Where the avalanche problem(s) for the day is(are) likely to be.
- Dig for a reason. What are we looking for?
- Who has dug a pit before? How long ago? Why? What were you trying to accomplish?
- How big are our snow pits?
- Big enough to target the layers we’re looking for.
- For today, wide enough for two people to be in the pit comfortably. About 150-200cm wide.
- Maximum depth 120cm (unless targeting a deeper weak layer).
- Big enough to target the layers we’re looking for.
- Demonstrate how to layout your snow pit (instructor preference).
- Use probe, hand, or shovel to physically mark snow.
- Draw Inner line to dig quickly to 6” from your outer edge of the pit you want to be clean.
- Get students into pairs and release them to choose a pit location, layout their pit outlines, and dig out their rough pit to their inner lines.
- While students are doing this, dig out the majority of your pit and carve your walls to perfection on one side while leaving the other to use as a demo.
- Call back over students when folks are getting close to getting the rough pit carved out.
- Demonstrate common mistakes.
- Walls wider at bottom.
- Carving away too much snow.
- Being inconsistent.
- Why do we want the pit looking good?
- Easier to identify layers and interfaces.
- Results are more reliable.
- It’s a scientific process! Be scientific!
- Sexy pits make for sexy photos.
- Demonstrate strategies for not making these mistakes and making the pit look sexy:
- Vertical probe guide.
- Overlap shovel with previous carving.
- Shave off a little (can always take off more, can’t put snow back).
- Corners – Not leveraging.
- Make shovel shaft smaller.
- Carve or brush at an angle. Back of gloved hand, brush.
- Have folks return to their pits to finish carving their pits.
- Each student takes a side and a corner of the pit to do.
- Have students return and talk about pit nomenclature:
- Test Wall (uphill wall)
- Obs Wall (one of your side walls)
- The shady one!
- The sun changes the snow.
- Demonstrate layer ID.
- Any layers we can ID visually?
- Ungloved hand to feel the snow.
- Use finger tips.
- Draw lines along interfaces for visual markers.
- Explain what you’re feeling (hard, soft, crust, firm, etc.)
- Ask what the lines you’re drawing are and make sure they understand the difference between layers and interfaces. Interfaces are the lines, layers are what are in between the interfaces.
- Demonstrate Hand Hardness.
- Have students open up their field books to a Test Profile page.
- Talk through the graph and what F, 4F, 1F, P, K, and I mean. Why do we use these?
- Everyone should have these tools with them in the field.
- Easily repeatable process.
- Show example of completed profile as an example.
- For AIARE 2, ask for volunteer to help record profile.
- Starting from the top, work down obs wall with hand hardness.
- Give layer depths and hardness.
- Introduce +/- if appropriate.
- From layer ID and Hand hardness, any layers of concern?
- For AIARE 2, point to Tool Box Approach Cards and Common Weak Layer Characteristics below test profile graph. For AIARE 1, just the common weak layer characteristics.
- Hardness <1F
- Diff in hardness >1 Step.
- Depth of interface 20-85 cm? (Easy to trigger as rider.)
- Persistent grain type?
- Large grain?
- Apply the Checklist Sum: 5 or 6 layer/interface properties? Weak layer wetted and at 0 deg C?
- Release students to go back to their pits and take turns going through layer ID and hand hardness.
- For AIARE 2, have one person do hand hardness while other records in book. For Level 1, have them work together to complete layer ID and hand hardness.
- Bounce around and provide feedback and answer questions.
- Make sure both students in pairings get to try hand hardness.
- Call students back over and demonstrate small column test.
- For AIARE 2, is there anyone who feels good demonstrating a CT?
- Shovel tilt or shear test before if appropriate.
- What is the difference between Informal and formal tests?
- Small column tests are primarily layer ID tests.
- ID layers we may have missed by looking and feeling.
- Provide depth and location of possible layers of concern.
- Adds measured load onto the snowpack to see what happens! Why taps? That ease of repetition again.
- Do CT or DT (if known deeper weak layer present).
- Page 62 in Field Book.
- Measure and mark snow.
- Isolate column completely.
- Cut back last and leave saw in.
- If a break occurs, pull on upper column above break with both hands. Does it slide easily? Ask them which code they would use to describe it.
- Fracture Character. (Page 62)
- Explain each (SP, SC, RP, PC, BRK)
- What ones are a red flag? SP and SC (pops and drops).
- What did we see?
- For AIARE 2, point to toolbox approach card and recommendations depending on the CT or DT result.
- Conduct ECT?
- Conduct PST?
- Repeat CT or DT in different location? Spatial Variability is real.
- For AIARE 1, just break and have folks repeat a CT in their different location so you get a couple different results. Provide feedback on technique and answer questions.
- What do large column tests tell us?
- Propensity for crack propagation.
- Why use ECT over PST or visa versa? (Depth of weak layer).
- Perform a large column test (If Appropriate)
- Always do for the AIARE 2 even if we won’t get anything. It’s good for folks to practice and get feedback on their technique.
- For AIARE 1, only demonstrate one if appropriate (you’ll likely get a result). If no SP or SC fracture character after repeated CTs, don’t need to do a larger column test.
- Pit debrief.
- What is the purpose of digging a snowpit?
- ID any layers of concern.
- Education (feeling and touching the snow yourself so you better understand avalanche problems, layers, and interfaces).
- Establishing baseline knowledge of snowpack in a location you’re new to for the season or after a major storm event.
- In a place without an avalanche bulletin and no obs to pull from besides what you collect yourself.
- Tracking a known weak layer over time.
- How long do pits take?
- Full test pits take a while at the start! But get easier and quicker the more you do them.
- Hand pits take a few minutes and you can do many throughout the day in many different locations! Remember, pits just need to be “Big enough” to do what you want to do. There is no SWAG standard for size.
- How often do you think I dig full test pits when I’m out ski guiding or skiing personally?
- Seldom. 1-2 times per season.
- Spatial Variability. A pit is just one piece of data in one singular location.
- Bigger picture is more important than any one data point.
- If it’s considerable avalanche danger for persistent slab at all aspects and elevations in the bulletin, but you just dug a pit and didn’t get any results, would you ride in avalanche terrain?
- Heck no!
- Spatial Variability
- Can always go from green to red, but never red to green based on pit results.
- For AIARE 2 mention run lists and opening and closing terrain.
- What is the purpose of digging a snowpit?
Back to Top | Back to AIARE 1 Field Activities
Debrief
The debrief! Here’s your chance to actually hear from students what they think they learned, where they were most at risk, or whatever else you want to ask them about. The debrief allows you to actually know what your students are thinking as well as tease out the most important lessons from the day and the course as a whole. Also, driving home how important it is to complete a debrief every time they go out and providing them with an easy, repeatable process will hopefully inspire them to think more critically about their days in the hills. The debrief allows us all to synthesize learning and gain good experience rather than haphazardly gaining experience. Here’s some activities to get the most out of your debriefs!
The Classic Debrief the Day
Provided by: Zack McGill
- Were conditions what we expected?
- What is going to happen to avalanche danger overnight? What should we be concerned about tomorrow?
- Did we make good decisions today? Or did we just get lucky?
- Where were we most at risk?
- Knowing what we know now, how could we have improved our plan for the day? Is there anything you would have done differently?
- Submit an observation to NWAC?
Fieldbook Debrief
Provided by: AIARE
Summarize Conditions:
- How did today’s weather affect conditions?
- What is the primary avalanche concern?
- Is the danger increasing or decreasing?
Review Today’s Decisions:
- What were the strengths and shortcoming of today’s plan?
- Where were we most exposed to avalanche risk?
Improve Today’s Plan:
- What could we have done better?
- Submit Observations
End of Course Debrief
Provided by: Zack McGill
- Student Self Evals:
- What is something you feel comfortable teaching someone else after this course?
- What do you still not fully understand?
- Biggest takeaway?
- Review course goals:
- Learn a decision making process so that students make decisions based on data and not purely human emotions.
- Next steps:
- Go Skiing or Riding!
- Take a ski lesson or two in bounds.
- Bang out laps at the resort to get more comfortable skiing and riding.
- Backcountry skiing Course
- Intro to BC
- Glaciated Ski Course
- Steep Ski Techniques Course.
- First aid WFR/WFA.
- Navigation Course
- Avalanche Rescue.
- Level 2.
- Mentorship.
- Alumni tours.
- Build good experience, ease into terrain.
- Go Skiing or Riding!
- Resources: they’ll get an email filled with all the resources they could ever want.
Tips: Any electronic tips can be sent to: Course Leader. That info will be put in resources email.
Back to Top | Back to AIARE 1 Field Activities
Level 2 Classroom
You’ll come across a wide variety of experience levels on the level 2. You’ll get the gambit from aging telemark skiers who’ve been riding the backcountry for decades and then folks with a single season of backcountry touring under their belt and maybe just a dozen tours total. Here’s some activities to help you engage your students regardless of how much experience they have.
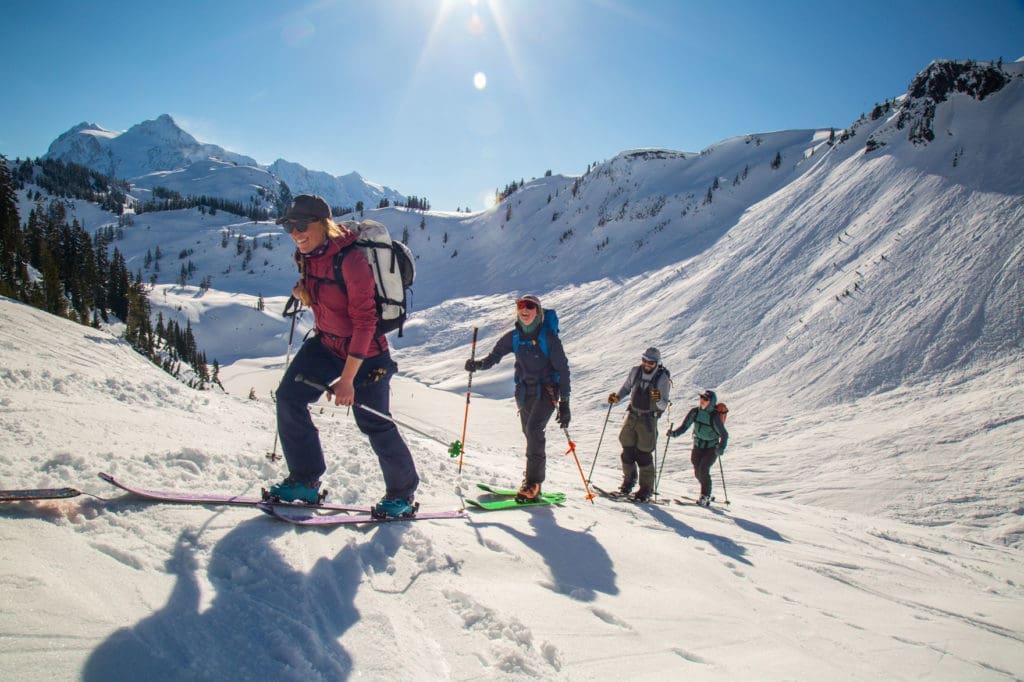
AIARE 1 Review | Uncertainty | Terrain Choice | Humans
Level 1 Review
Folks may have taken their AIARE 1 years ago! Even if they took it just a year ago, they’ll still need some review to make sure everyone is up to speed before diving deeper into the level 2 curriculum. Here’s some review activities.
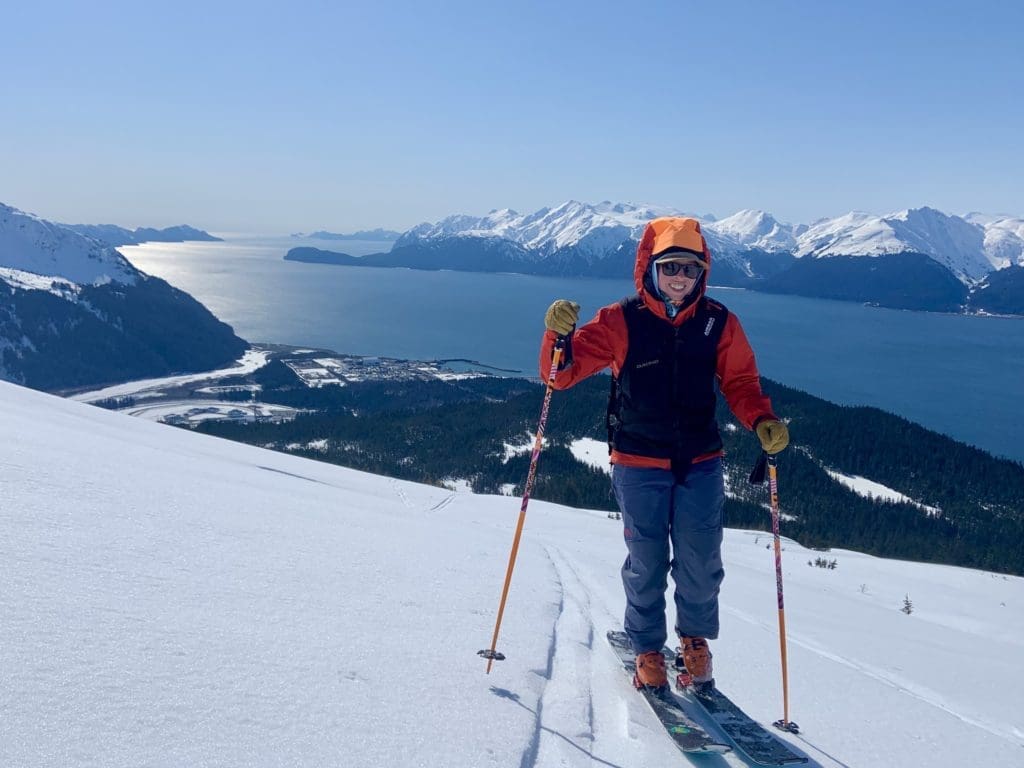
Zone Homework
Provided by William “Willie” Webster
I assign a little more work in level 2. Each student chooses a different backcountry zone, some place well out of the area we’re teaching the course in, preferably a different snowpack. Their job is to map out some potential runs/ zones with attention to slope angle, aspect, elevations, ect. Then they need to dig into the local advisory’s archives and come up with a synopsis of the season’s snowpack and weather history paying close attention to any PWLs. Lastly, they look at the current hazard and the weather forecast. This kind of ‘assignment’ could go on forever, so I encourage them not to overdo it, just look for the main trends. Students can share with one another what they discovered and any issues they had in doing research. Students found this valuable because many of them looked into areas that they were planning on visiting that season.
Pre-Course Quiz
Provided by: Nicholas Vincent “Vince”
Level 2 Pre-Course Test
Name____________________________
- Slab avalanches most often occur on slopes between what angles?
- 15 – 50 degrees.
- 20 – 45 degrees.
- 30 – 45 degrees
- all of the above
- Give 3 examples of terrain traps.
- List 3 common trigger points.
- The most time consuming and challenging part of rescue is_____________.
- Shoveling
- Probing
- Signal Search
- Fine Search
- The most common snowpack in a continental snowpack would be?
- Deep, warm dense snowpack
- Deep, cold snowpack
- Shallow, cold snowpack
- Shallow, dense warm snowpack
- Rounding occurs in the snowpack when…?
- Typically, loose dry avalanches…?
- Bury you
- Push you into terrain traps
- Are always too small to cause harm
- Are fan shaped
- Both A and D
- Both B and D
- Name the 4 avalanche problems that are a result of new snow and/or wind
- Provide a short answer: Persistent weak layers are most commonly found in which snow climate, why, and provide examples of a few.
- A ____avalanche has enough potential to bury, injure or kill a person.
- D1
- D2
- D3
- D4
- D5
- An isolated tree or rock in the middle of a potential avalanche path is considered a what?
- Island of safety
- Trigger point
- Terrain trap
- Anchor
- Whumping noises from the snow pack while you are standing or skiing is a sign of______________.
- Stability
- Instability
- Uncertainty
- List 2 field tests you can conduct in the backcountry to gather information about storm slabs that do not include digging a pit.
- After getting a potential strike with a probe pole you should?
- Probe poles are “old school” in companion rescue, we now just use shovels
- Leave the probe pole in place & start digging.
- Take the probe pole out & start digging where the probe pole was
- List 4 “red flags” you may encounter during potential unstable conditions .
- List the 4 elements of the RIDE SAFELY section of the Decision Making Framework
- What is teamwork the antidote for and what are 4 common rules of teamwork?
- After a cold snowfall, extremely rapid warming will make avalanche conditions safer?
- True
- False
- If someone in your group of 3 gets buried in the backcountry, one person goes for help?
- True
- False
- You have just pinpointed someone buried 2m in an avalanche. You should start digging
- In the general vicinity of the probe pole
- 1.5 meters downhill of the probe pole
- 1.5X downhill the burial depth
- None of the above
- Outside of a beacon, shovel, probe, list 3 emergency equipment items you should always bring with you while traveling in the backcountry
- We know cell phones cause interference to avalanche transceiver. Putting them into airplane mode resolves this problem.
- True
- False
- Historically, which state has the most avalanche fatalities?
- California
- Alaska
- Colorado
- Utah
- Today’s avalanche problems are
- Storm Slabs
- Persistent Slabs
- Wind Slabs
- Loose Dry
- Loose Wet
- In regards to the AIARE Decision Making Framework:
Each Season we_____________
Each Day we __________, _________, ________, with ________ happening throughout the day
- What 3 things are needed for an avalanche to occur (the avalanche triangle)
- When surface hoar is buried it is called
- Depth hoar
- Buried Surface Hoar
- Weak Layer
- Both 2 and 3
- You should always remove your probe pole from the snow after a probe strike before you begin shoveling?
- True
- False
- When conducting the signal search of a rescue it starts where?
- The top of the avalanche path
- just above the avalanche path
- At the point last seen
- At the point your beacon says 10 meters
- It is important to keep the orientation of your beacon the same (don’t change the orientation) during a fine search?
- True
- False
- Utah has a _____ snowpack.
- Continental
- Maritime
- Intermountain
- The following is typical of a continental snowpack:
- Infrequent storms
- Average cold temps
- Persistent weak layers
- All of the above
- If you see tracks on the slope you are planning to ski, we can assume it is safe to ski?
- True
- False
- What is the BEST clue of instability in the snowpack
- Naturally Occurring Avalanches
- Falling Cornices
- Human Triggered Avalanches
- Shooting Cracks
- The most common cause of death in avalanches is?
- Hypothermia
- Trauma
- Heart Attack
- Asphyxiation
- When the avalanche danger is Considerable
- Human triggered avalanches are LIKELY
- Human triggered avalanches are POSSIBLE
- Natural avalanches are LIKELY
- Avalanches don’t occur when the danger is considerable
- You “CLOSE” a run called “Ginger Glades” in the morning during your planning session. You dig a pit on a slope representative to Ginger Glades. Test result shows a strong snow pack and the danger on the slope is MODERATE. The slope is 36 degrees. Can you now open this run?
- T
- F
- The avalanche danger is LOW. This means there is no avalanche danger?
- T
- F
- Which of the following is a Persistent Weak Layer
- Depth Hoar
- New Snow
- Wind Slab
- Surface hoar that has not been buried
- What is the safest route choice?
- Up a 30 degree bowl
- Up through sparse 30 degree flagged trees
- In a low angle gully beneath a 33 degree avalanche path
- Up a ridge
Extra credit: What does FACETS stand for in regards to human factors….
F
A
C
E
T
S
Uncertainty Minefield
Provided by Carly Mentink
This is for an in-person classroom session for Level 1 or Level 2 students to discuss/frame uncertainty.
Set-Up: Group the students into two’s and make an obstacle course of landmines using chairs and tables. One student gets blind-folded. Once the student is blind-folded, add other small obstacles to the last 3rd of the obstacle course (unknown-unknowns).
Activity: The blindfolded student has to begin making their way across the room without assistance. After about 1/3 of the way, their partner is allowed to give them verbal cues to help them navigate. After 2/3 of the way, their partner is allowed to give navigational assistance both verbally and physically using an arm or shoulder. Once the initiative is finished we have a discussion around the blind-folded student’s level of confidence based on the uncertainty involved and then move into talking about our knowns and unknowns.
TERRAIN CHOICE ACTIVITY
Provided by: Zack McGill
The goal of this activity is to:
- Check for understanding to ensure students can identify trigger points and terrain traps in terrain.
- Have students begin to think critically about specific avalanche problems and where they exist in terrain by engaging in conversation with their peers/instructors.
Directions:
- One person from the group should open up the terrain photo and Topo Map linked to S Face Herman below and share their screen. That person can then toggle between the activity directions below and the photo/map. *You should use a photo of terrain from your venue where students are likely to travel.
South Face Herman (Terrain Photo) (Topo Map)
- For your assigned scenario below, given the avalanche problem and descriptions, utilize the annotate function on the Terrain Photo to:
- Discuss what observations you could make to reduce your uncertainty with the avalanche problem.
- Identify an up track that most avoids the avalanche problem for the day. If timing is a factor, take note of that! If in your opinion no safe route exists through the terrain, come up with a statement as to why.
- Identify a down track that most avoids the avalanche problem for the day – same notes as above.
- Place “X” Stamps on 3 potential Trigger Points for the avalanche problem described.
- Circle 3 terrain traps to avoid.
- Take a screenshot of your terrain photo/topo map!
South Face Herman (Terrain Photo) (Topo Map)
SCENARIO 1
Avalanche Hazard: Moderate Upper and Middle Elevations. Low Lower Elevations. Avalanche Problem: Persistent Slab – NW-N-NE Aspects – Middle and Upper Elevations. Possible – Small-Large (D1-D2).
Weather: Cold (high of 25F) and clear with calm winds.
Snowpack: A buried layer of surface hoar (SH) 30-40cm down on some shaded, sheltered northerly aspects has produced large avalanches in recent weeks, but no observed avalanches or buried SH found by observers on other aspects.
SCENARIO 2:
Avalanche Hazard: Moderate AE (All Elevations). Loose Wet – SW-S-SE Aspects in PM – Lower and Middle Elevations. Likely – Small-Large (D1-D2).
Weather: 5” of new snow overnight. During the day, clear skies, and high temperatures in the low 30’s with calm winds expected.
Snowpack: Beneath the 5” of snow overnight is a stout, supportable rain crust. Beneath this crust are no layers of concern.
SCENARIO 3:
Avalanche Hazard: Considerable All Aspects (AE). Avalanche Problem: Storm Slab – All Aspects and Elevations (AA+E) – Likely – Large (D2).
Weather: 7” new snow overnight, low of 24F with light winds. During the day: Overcast, with increasing temperatures to a high of 32F by 2PM. 5-8” Snow expected throughout the day (mostly after 10AM) and calm to light winds.
Snowpack: Beneath the 7” of new, low density snow is layer of decomposing fragments 4F-1F in hardness. No layers of concern further down.
THE TERRAIN CONTRACT
Provided by: Anne St. Clair
Human Factor Madlibs
Provided by: Sara Boilen
A really nice culmination activity for assembling the group is to have students answer and then share their own Human Factor Madlibs.
Back to Top | Back to AIARE 2 Classroom Activities
Level 2 Field
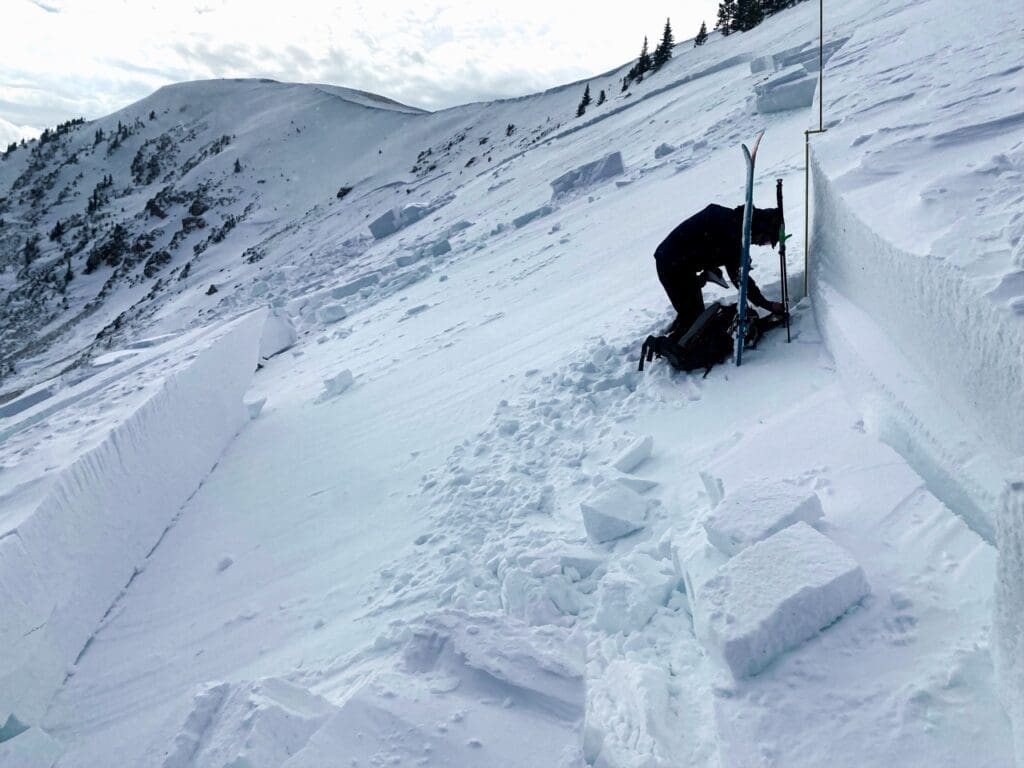
The Tool Box Approach Activity
Provided by: Zack McGill
This is my general process for snowpits. As always, there’s tons of room for differentiating based on the crew, the weather, and the experience level of folks. For a level 2 course, before heading into the field, I provide students with a digital PDF to save on their phone, or a physical card of the Toolbox Approach. I also carry a few laminated copies in my snow science kit to pass around to folks. I use this card as a scaffold to guide folks through snowpack obs.
For AIARE 1, I typically only use the Field Book and don’t mention the tool box approach at all, just do the process as laid out in the book. In addition, while I may do more demonstration in the level 1 and giving of answers/explaining. I ask prompting questions more in the level 2 and have students jump in and demonstrate things more if they’re able (like have them cut a CT instead of me). If they completely blow it and don’t do a good job or send it, both work well for learning.
- Where we dig snowpits.
- Safe location (not avalanche terrain).
- Representative Slope.
- Aspect (sun and wind).
- Elevation.
- Away from trees/tracks.
- Be as far away from trees as they are tall.
- Where the avalanche problem(s) for the day is(are) likely to be.
- Dig for a reason. What are we looking for?
- Who has dug a pit before? How long ago? Why? What were you trying to accomplish?
- How big are our snow pits?
- Big enough to target the layers we’re looking for.
- For today, wide enough for two people to be in the pit comfortably. About 150-200cm wide.
- Maximum depth 120cm (unless targeting a deeper weak layer).
- Big enough to target the layers we’re looking for.
- Demonstrate how to layout your snow pit (instructor preference).
- Use probe, hand, or shovel to physically mark snow.
- Draw Inner line to dig quickly to 6” from your outer edge of the pit you want to be clean.
- Get students into pairs and release them to choose a pit location, layout their pit outlines, and dig out their rough pit to their inner lines.
- While students are doing this, dig out the majority of your pit and carve your walls to perfection on one side while leaving the other to use as a demo.
- Call back over students when folks are getting close to getting the rough pit carved out.
- Demonstrate common mistakes.
- Walls wider at bottom.
- Carving away too much snow.
- Being inconsistent.
- Why do we want the pit looking good?
- Easier to identify layers and interfaces.
- Results are more reliable.
- It’s a scientific process! Be scientific!
- Sexy pits make for sexy photos.
- Demonstrate strategies for not making these mistakes and making the pit look sexy:
- Vertical probe guide.
- Overlap shovel with previous carving.
- Shave off a little (can always take off more, can’t put snow back).
- Corners – Not leveraging.
- Make shovel shaft smaller.
- Carve or brush at an angle. Back of gloved hand, brush.
- Have folks return to their pits to finish carving their pits.
- Each student takes a side and a corner of the pit to do.
- Have students return and talk about pit nomenclature:
- Test Wall (uphill wall)
- Obs Wall (one of your side walls)
- The shady one!
- The sun changes the snow.
- Demonstrate layer ID.
- Any layers we can ID visually?
- Ungloved hand to feel the snow.
- Use finger tips.
- Draw lines along interfaces for visual markers.
- Explain what you’re feeling (hard, soft, crust, firm, etc.)
- Ask what the lines you’re drawing are and make sure they understand the difference between layers and interfaces. Interfaces are the lines, layers are what are in between the interfaces.
- Demonstrate Hand Hardness.
- Have students open up their field books to a Test Profile page.
- Talk through the graph and what F, 4F, 1F, P, K, and I mean. Why do we use these?
- Everyone should have these tools with them in the field.
- Easily repeatable process.
- Show example of completed profile as an example.
- For AIARE 2, ask for volunteer to help record profile.
- Starting from the top, work down obs wall with hand hardness.
- Give layer depths and hardness.
- Introduce +/- if appropriate.
- From layer ID and Hand hardness, any layers of concern?
- For AIARE 2, point to Tool Box Approach Cards and Common Weak Layer Characteristics below test profile graph. For AIARE 1, just the common weak layer characteristics.
- Hardness <1F
- Diff in hardness >1 Step.
- Depth of interface 20-85 cm? (Easy to trigger as rider.)
- Persistent grain type?
- Large grain?
- Apply the Checklist Sum: 5 or 6 layer/interface properties? Weak layer wetted and at 0 deg C?
- Release students to go back to their pits and take turns going through layer ID and hand hardness.
- For AIARE 2, have one person do hand hardness while other records in book. For Level 1, have them work together to complete layer ID and hand hardness.
- Bounce around and provide feedback and answer questions.
- Make sure both students in pairings get to try hand hardness.
- Call students back over and demonstrate small column test.
- For AIARE 2, is there anyone who feels good demonstrating a CT?
- Shovel tilt or shear test before if appropriate.
- What is the difference between Informal and formal tests?
- Small column tests are primarily layer ID tests.
- ID layers we may have missed by looking and feeling.
- Provide depth and location of possible layers of concern.
- Adds measured load onto the snowpack to see what happens! Why taps? That ease of repetition again.
- Do CT or DT (if known deeper weak layer present).
- Page 62 in Field Book.
- Measure and mark snow.
- Isolate column completely.
- Cut back last and leave saw in.
- If a break occurs, pull on upper column above break with both hands. Does it slide easily? Ask them which code they would use to describe it.
- Fracture Character. (Page 62)
- Explain each (SP, SC, RP, PC, BRK)
- What ones are a red flag? SP and SC (pops and drops).
- What did we see?
- For AIARE 2, point to toolbox approach card and recommendations depending on the CT or DT result.
- Conduct ECT?
- Conduct PST?
- Repeat CT or DT in different location? Spatial Variability is real.
- For AIARE 1, just break and have folks repeat a CT in their different location so you get a couple different results. Provide feedback on technique and answer questions.
- What do large column tests tell us?
- Propensity for crack propagation.
- Why use ECT over PST or visa versa? (Depth of weak layer).
- Perform a large column test (If Appropriate)
- Always do for the AIARE 2 even if we won’t get anything. It’s good for folks to practice and get feedback on their technique.
- For AIARE 1, only demonstrate one if appropriate (you’ll likely get a result). If no SP or SC fracture character after repeated CTs, don’t need to do a larger column test.
- Pit debrief.
- What is the purpose of digging a snowpit?
- ID any layers of concern.
- Education (feeling and touching the snow yourself so you better understand avalanche problems, layers, and interfaces).
- Establishing baseline knowledge of snowpack in a location you’re new to for the season or after a major storm event.
- In a place without an avalanche bulletin and no obs to pull from besides what you collect yourself.
- Tracking a known weak layer over time.
- How long do pits take?
- Full test pits take a while at the start! But get easier and quicker the more you do them.
- Hand pits take a few minutes and you can do many throughout the day in many different locations! Remember, pits just need to be “Big enough” to do what you want to do. There is no SWAG standard for size.
- How often do you think I dig full test pits when I’m out ski guiding or skiing personally?
- Seldom. 1-2 times per season.
- Spatial Variability. A pit is just one piece of data in one singular location.
- Bigger picture is more important than any one data point.
- If it’s considerable avalanche danger for persistent slab at all aspects and elevations in the bulletin, but you just dug a pit and didn’t get any results, would you ride in avalanche terrain?
- Heck no!
- Spatial Variability
- Can always go from green to red, but never red to green based on pit results.
- For AIARE 2 mention run lists and opening and closing terrain.
- What is the purpose of digging a snowpit?
ATES for Terrain ID
Provided by: Grant Statham. Adapted by: Kenzie Carson.
Note: OnX Backcountry released an ATES layer in early winter ‘24 that included 1-4 categories.
Intro:
– Print ATES v.2 cards prior to field days
– Pass cards out and cue students to rate pieces of terrain as you travel
– Have students discuss routes that would limit exposure and routes that would expose riders to the most exposure
– Given our conditions for today, what terrain rating aligns with your risk tolerance?
– If you had to move through X terrain how would you travel to limit exposure? (This should cue students to discuss travel techniques)
– If conditions allow, pick a piece of terrain that is within the risk tolerance of the group and have students lead their group through the terrain.
– Debrief once through the terrain.
– What went well or could be improved with how travel was executed?
– Where were individuals or the group most exposed?
– Was every group member clear about the plan?- Any comms concerns or considerations?

Downhill Checklist
Provided by: Kenzie Carson
The goal of this activity is to give students a tool to guide conversations with team members to discuss downhill travel techniques to limit exposure, build consensus and clarity of the downhill route.
- Can print the below cards and give out to students
- Have a student volunteer lead this conversation at each transition
After transitioning from uphill mode to downhill run through this checklist:
| Downhill Checklist 1. Do we have a large enough margin to avalanches and other hazards? 2. What happens if there is an avalanche? Any terrain traps below? 3. Where we go? – What’s our route? Where are we stopping? Anywhere we SHOULDN’T stop? 4. How we go? – One at a time, all together, spaced out? Will we lose visibility or comms with each other? If so, what’s the plan? 5. When we go? – Any one not ready? Be sure to GO when we agreed. |
Avalanche rescue
You’ll likely start out doing similar activities on the avalanche rescue course as you did on the first level 1 field day to get students remembering what they learned however long ago they took the level 1. You’ll also get a baseline understanding of where they’re at. Starting out with the probe and shovel race outlined above in the Level 1 Field section is still a great way to kick off a rescue course. Even if they’ve done it before, hopefully they’ve improved! The activities we’ll concentrate on here are specific to the rescue course. Specifically, multi-burials.
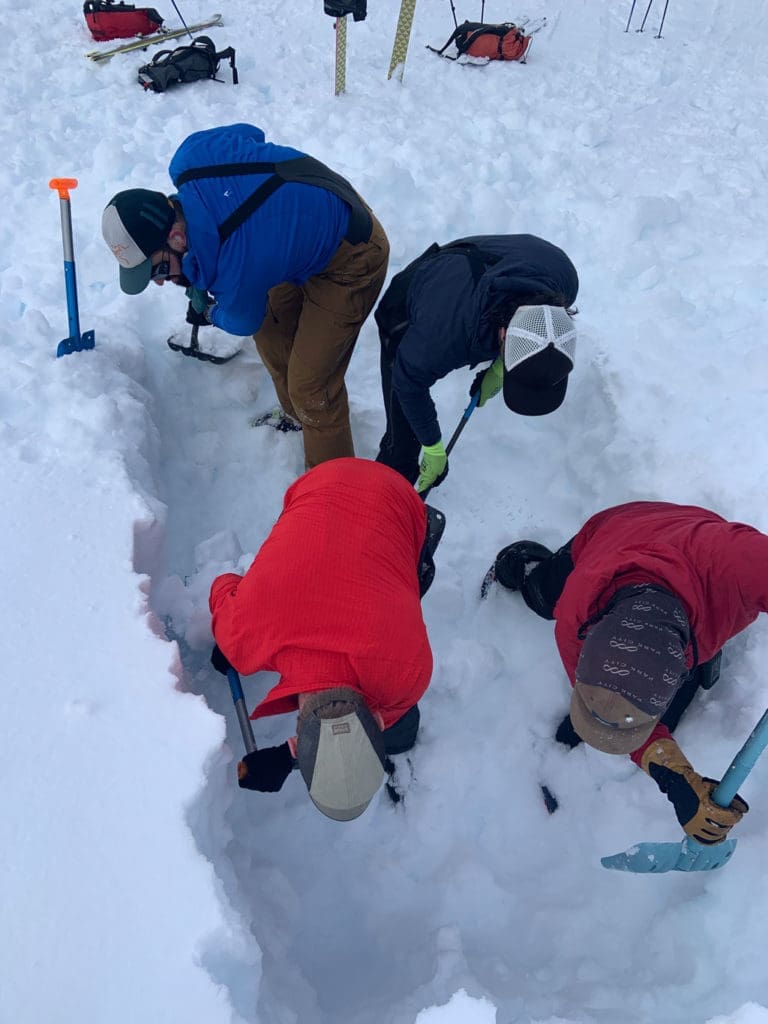
Here’s some activities specific to avalanche rescue.
SHovel Drill Activity
Provided by: Julie Ann Holder
Have students practice strategic shoveling with a twist! Ask them how many people they typically ride with. Whatever they tell you is their most common group size is the number of people they get to dig with.
- Students dig down 1-1.5 meters to about the average burial depth in an avalanche while being timed by the instructor. Offer little to know feedback on form unless students are shoveling in a way that will hurt themselves or others.
- After everyone finishes, talk through the times and link to how long folks have under the snow before they die of asphyxiation. This should drive home that getting caught in an avalanche isn’t awesome and the likelihood of being able to rescue someone caught in a big avalanche successfully is tough.
- Segway this talk into a discussion on best group size.
If you want some ideas on strategic shoveling techniques, check out this Strategic Shoveling Techniques resource.
Probe and Shovels Race
Provided by: Zack McGill
At the trailhead during your trailhead check, you’ll need to get eyes on everyone’s avalanche safety gear anyway, so this activity is perfect for not only checking that box, but getting folks moving and getting acquainted with their gear.
- Have folks fully strapped in ready to tour with backpacks on.
- Tell them that on the count of 3, they will need to drop their packs, get out their probe and shovel, fully deploy each, and put them in the snow in front of themselves. They will be timed.
- After folks figure it out (feel free to stop some folks early if they can’t figure out how to put together their probe) talk about differences in probes and shovels and demonstrate how to deploy both efficiently. Make sure to talk about backcountry touring specific backpacks and the importance of storage of probes and shovels inside backpacks and not on the outside! Oh… and tell them to leave those probe bags at home!
Probe Technique
Provided by: Zack McGill
Students have a hard time with probing, so a demonstration of why it’s important is prudent before setting them loose to practice on their own.
- Point folks to the diagram in the field book showing good probing technique:
- Then have a student lie down in the snow (as long as it’s not too stormy, use a backpack if folks are cold).
- Stand over them with a probe and show how even the slightest difference in angle at the surface causes problems in deep burials as you can miss the buried human even if keeping to the spiral pattern.
The Art of Probing
Provided by: Karin Pocock. Adapted by: Kenzie Carson
Note:
This activity can be used as a way to teach probing or as a course correction for ineffective probing.
Set Up:
-Gather students together and demonstrate how to mark out a 1m x 1m x 1m x 1m box with a probe in an undisturbed patch of snow.
-Have each student find an undisturbed patch of snow to mark out their own box
-Tell students they will have an undisclosed amount of time to probe from the center of their square out to the edges. The goal is to make their probe strike holes as precise, perfect and even pretty as they can. At the end we’ll go on an art walk and decide which box looks the best!
Practice:
–Set a timer for 1 min, don’t tell students they only have 1 min.
-Stop them after 1 min, walk around and discuss with students what was hard or easy about the goals of a “perfect box,” see who was able to probe the whole box. (Many students will successfully probe 1m box in 1min)
-Use this as an example that taking your time to do precise, methodical probing will save time.
– Have someone lay in one of the boxes that didn’t successfully make it to the edges and demonstrate that even if you don’t cover 1m2 per 1 min, you will likely still get a positive strike.
Components of Rescue – “Work it Backwards”
Provided by: Chris Pruden
Intro:
-Break students into rescue teams, ideally 2-3 folks per team.
-Discuss how rescue scenarios are not representative of real-world scenarios: We’re not navigating a crown, bed surface that may be full of rocks, dirt, trees, rocks, it is often hard to bury transceivers far enough away to thoroughly practice course search….
-Another key component of rescue to remember is that beacons find other beacons or really bring you close to another beacon, the probe is what actually finds the victim and shoveling is what allows this person to begin breathing again, which is the ULTIMATE goal of rescue.
-As such, we will break each step of rescue down and practice each component starting with the most valuable tool – shoveling.
Shoveling
Place a probe 1-1.5 meters deep and instruct your team to work together to get to the tip of the probe as fast as they can!
-Can set this up as shovel races for each team
-Makes sure folks are communicating and rotating
-If time allows, have teams debrief what worked well for them and what could help them be more efficient. Bury another probe and see if they can reduce their time.
Probing
Next describe components of effective probing:
● Perpendicular to the slope
● Spiral or box configuration aprox 20cm apart or about a boot-length
● Remember to move your feet as you probe to maintain perpendicular angle as your spiral or box increases in size
● Hold probe with both hands and use it to feel what you’re hitting – remember not to give so much force that you break your probe or harm the victim.
● How to tell if it’s a positive strive? Will have more of a soft, bounce or squish feel to it, probe may not sink as deeply into debris.
● LEAVE PROBE IN! Once you get a positive strike
-Demonstrate:
Slow, methodical probing in spiral or box shape with two hands and moving your feet.
Have each student do this, walk around and give feedback on movements or technique.
Fine Search
-Bury a beacon
-Demonstrate and talk through key pieces of fine search:
● Keep beacon in same orientation on XYZ axis (right, left, up, down) Only change one variable at a time.
● Slow is smooth, smooth is fast – allow for the processor to keep up with your movements!
● Make numbers go down as you work your X,Y boxes.
○ Make sure you are thoroughly checking all up, down, right, left areas before
moving on!
● Can use ski poles to mark your high readings to keep you on track
● Mark your lowest reading to start probing
Have students practice fine search in their teams – give each other feedback
Following Signal
-Refresh on flux lines, beacon will likely bring you in on an arc
-Make the numbers go down! If they’re going up, stop, turn 180 deg in place, see if numbers go down again.
-Call out your numbers and be on the lookout for clues
-Demonstrate following a signal then have folks practice in their teams
Course Search
-Discuss each beacon has different ranges. At about 50-70m is when most transceivers will start to get a signal.
-Demonstrate acquiring a signal.
-Have students practice acquiring a signal
Put it all together!
Do a scenario following a rescue card.
Flux Line Demo
Provided by: Zack McGill
It’s important for folks to understand that they’ll be coming in on a curve most the time when following a signal with their beacon and to not expect to walk in a straight line. This activity will help demonstrate that.
- Find a large (at least 30m wide) open area that is mostly flat and snow covered.
- Have students follow you around in a large circle having individual students stop in the skin track every 15-20′ so after you’ve gone around once, students are evenly spread around the large circle.
- Walk to the center of the circle and instruct everyone to get out their beacons.
- Have students go to search and acquire your signal.
- Go around and have students shout out their numbers.
- Change the orientation of your beacon (for example hold it pointing up or vertically if you’d been holding it horizontally before).
- Have students shout out their new numbers.
- Change the orientation of your beacon once more and have them shout out numbers one more time.
- Go back to holding your beacon like you did to start and instruct the students to follow the signal into you while only going where the arrows tell them to go (only paying attention to their beacon.)
- After getting into you, have everyone take a few steps back to make a smaller circle and hold a discussion on what just occurred. Most folks will likely travel in an arc to reach you where some might have walked straight to you.
- Find a clean patch of snow and draw the 2D representation of Flux Lines on the snow and talk about why they traveled in a curve.
Make sure to talk about what it means if you’re following a signal in and the numbers get bigger! You’re taking the long way home. Flip 180 degrees and take the short way.
Continuing Education
Resources for instructors and students alike! The websites, courses, publications, and workshops detailed below are some of the things out there for folks to continue their education.
The Avalanche Review (TAR) – This AAA publication is chock full of really good stuff. You get it simply by being a professional member of the AAA… so if you aren’t reading it, DO IT! It’s SO GOOD!
NSAW – Attend or at least watch the Northwest Snow and Avalanche Workshop.
Navigation Course – Backcountry Navigation is an online course that teaches anyone going into the backcountry how to be prepared to navigate, create route plans, and perform a detailed terrain analysis of an avalanche environment.
The Backcountry Skiing Guide – This Resource is great to pass along to avalanche course students or anyone looking to get into the backcountry! It contains amongst other things:
- Skinning Techniques
- Downhill Travel Strategies
- Strategic Shoveling
- Human Factor
- Avalanche Problems
- Beacon Function Check
- Single Burial Avalanche Rescue
- First Aid Kits
- Repair Kits
- Whiteout Navigation
- Basic Navigation
Digital Mapping Tutorials – For a one time purchase of $25, individuals get access to hours of tutorials from Will McKay walking folks through the nuance of digital mapping programs like CalTopo, Gaia, and Fat Map.
AMGA – The American Mountain Guides Association Ski Guide track provides for folks to learn industry best practices for uphill and downhill guiding techniques and operational risk management.
Mountain Sense – Online digital content series for purchase from Mark Smiley.