Strategic Shoveling for Avalanche Rescue
By: Zack McGill
When most folks think of avalanche rescue, they think of the beacon search. We get it. Avalanche Transceivers are sexy. It’s cool technology that has noises and a display to look at that really appeals to our phone addicted minds. The reality is that the majority of your time in a rescue is spent shoveling! If you’re really good at your beacon search, you should be able to pinpoint the location of a buried victim in around two minutes. The rest of your time will be spend getting them out.
The Numbers
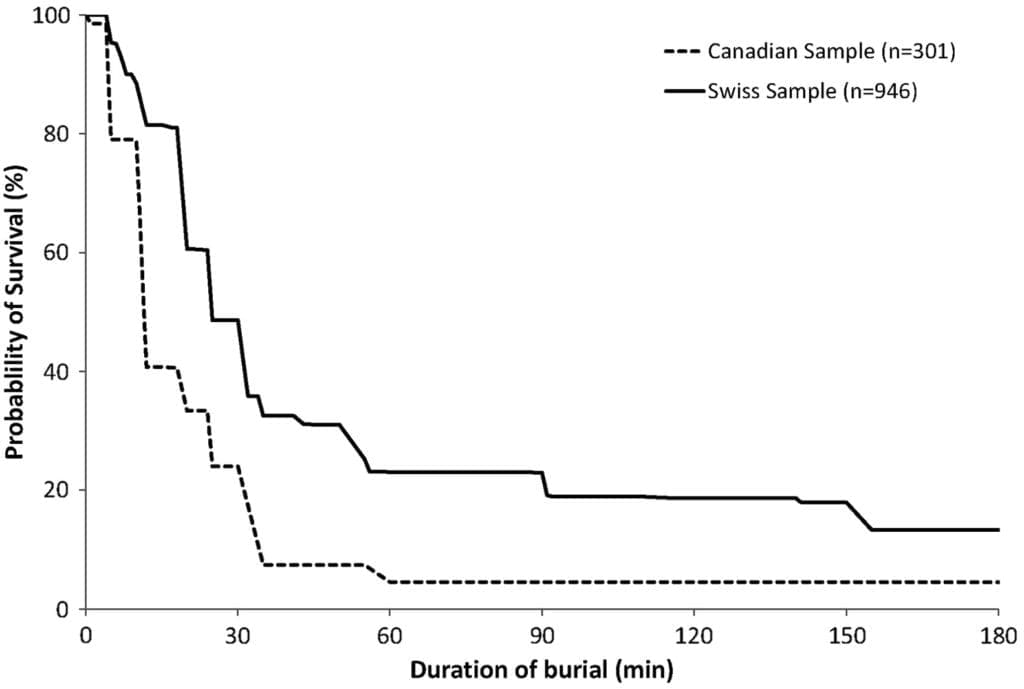
On average, folks get buried around 1.3 meters in avalanches, which equates to about 1-1.5 tons of snow to move in order to remove someone from avalanche debris. That’s just on average. Folks could be buried much deeper. Research tells us that if you get someone out in the first 10 minutes, they have a 92% chance of survival as long as they are not dealing with any major trauma. After that… the numbers are bleak. Survival rates drop to 37% after 35 minutes in a Swiss study and even worse (effectively 0%) in a Canadian Sample. See graphic below.
There is hope, however. From 1977-2000, the mean rescue time for recreational backcountry travelers (this includes beacon search) was 29 minutes. From 2000-2006, with the increase in avalanche education and more refined strategic shoveling techniques, the mean rescue time for recreational backcountry travelers decreased to 18 minutes. That’s quite the improvement!
Research shows that the best way to decrease rescue times and overall mortality rates is to decrease the time spent in the shoveling phase, so let’s get into it.
Strategic Shoveling Techniques
Always CHanging
Best practices with strategic shoveling are always changing and have improved dramatically even over the last five years. Even as I write this, there’s great minds figuring out ways to be even better at this. So remember to re-up on your education and don’t become entrenched in the mindset that there’s just one way to do something. Check in every couple years to hear about the latest and greatest!
Be Proactive
I tell everyone at the start of any avalanche rescue course that the best way to survive an avalanche is to be proactive and not get caught in one to begin with. Take an Avalanche Course and get the education to avoid needing your shovel for anything but training weight. Then, since this post is geared towards just the shoveling aspect of a rescue, make sure that you understand Single Burial Avalanche Rescue techniques and how to use your Avalanche Beacon and probe to pinpoint a buried person’s location.
Shoveling 101: The ABCs
So you’ve done your fine search with your beacon and have a low number, gotten out your probe, and you’ve got a probe strike! Nice! Hopefully, that process from Avalanche to probe strike took you 3 minutes or less, because the rest of your time and energy needs to go towards unburying your victim and getting them an airway. So where do you start? Once you’ve pinpointed a buried individual with a probe strike, the ABC’s tell you where to start digging.
Airway: Begin digging downhill (if you can) of the probe strike, and avoid standing on or above the probe to preserve the airway of the buried individual. You don’t want to collapse what little air pocket they may have!
Burial Depth: The burial depth tells you how far downhill you need to be before digging in towards the probe. The general rule is moving one step downhill for a 1 meter or less burial, 2 steps downhill for 2 meters, 3 steps for 3 meters, etc.
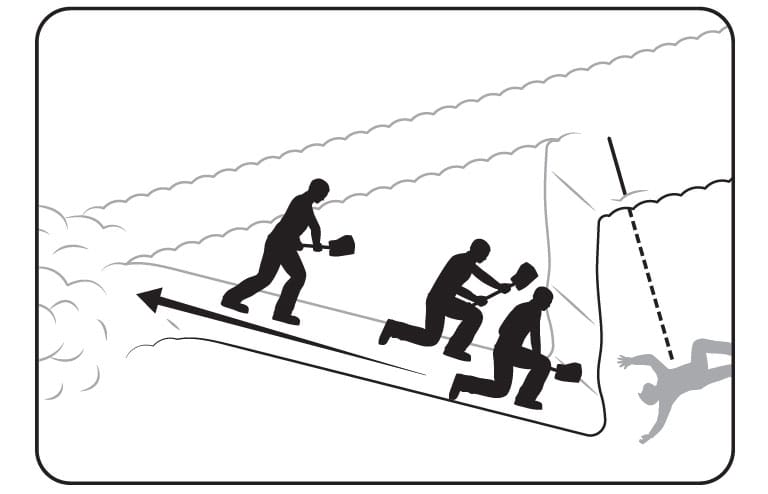
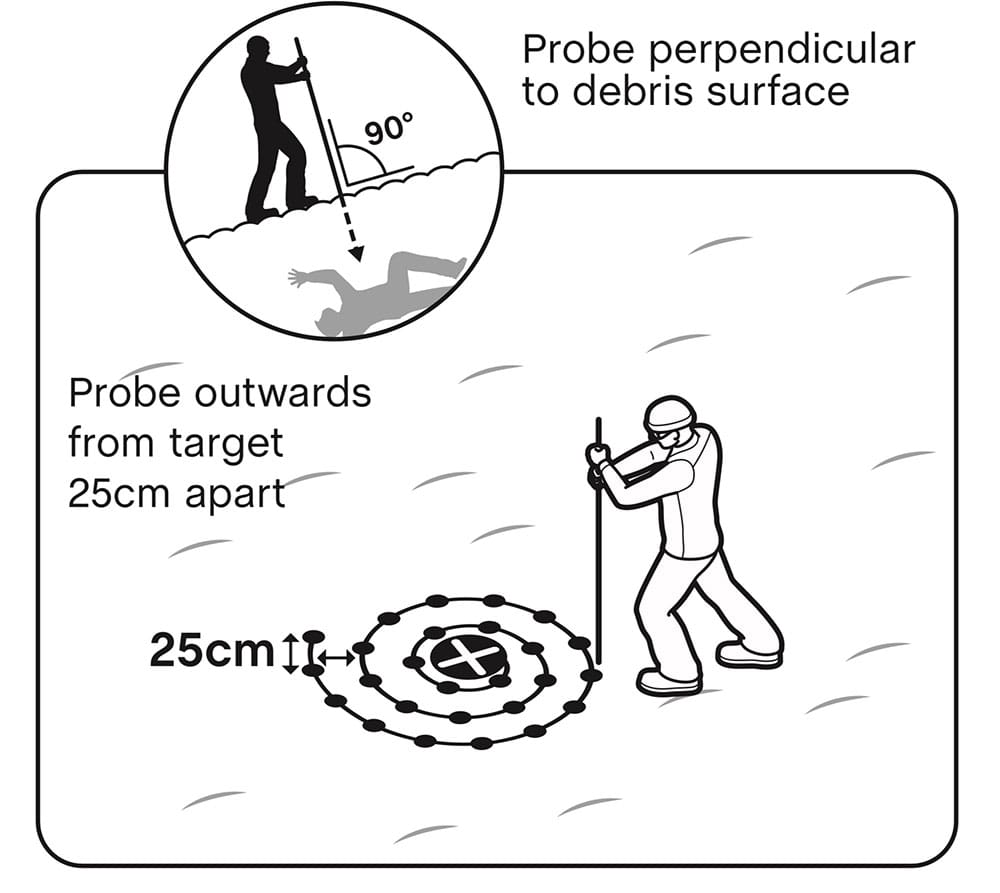
Clearing Snow: Ideally, you’ll clear snow downhill and to the sides by either chopping or paddling “chop and mop” (depending on conditions) in order to create a platform 1-2 meters wide nearest your victim and 2 meters wide at the back like in the diagram above. This allows you to have space to provide first aid after excavating the victim.
That said, your number one priority is to get that buried person an airway! You want to make sure you stay wide enough that when the hole gets deeper, you have room to work and continue to move snow, but don’t be obsessed with making your hole super wide and lose valuable time that could’ve been spent getting that buried person a way to breath.
To achieve the best outcome, start by clearing snow to the sides. This keeps the downhill side from building up with a lot of snow — preserving it for snow removal later once the hole is deeper. Once the hole is deep enough that lifting snow up and over the sides is inefficient and tiring, paddle snow downhill and to the sides.
Single Rescuer
If you ride in a team of two, that means if an avalanche occurs and your partner is buried, it’s all on you to get them an airway and provide assistance. Bummer. Despite that, keep the ABCs in mind as you dig: Start downhill, don’t stand on the probe/collapse their airway, and move snow downhill and to the sides as efficiently as possible.
You’re still aiming to get the slightly angled platform above, so you’ll need to make sure that you continually clear the snow at your feet and chop to the sides to make your hole wide. If you don’t, you’ll quickly end up in a narrow tunnel and not able to shovel efficiently anymore.
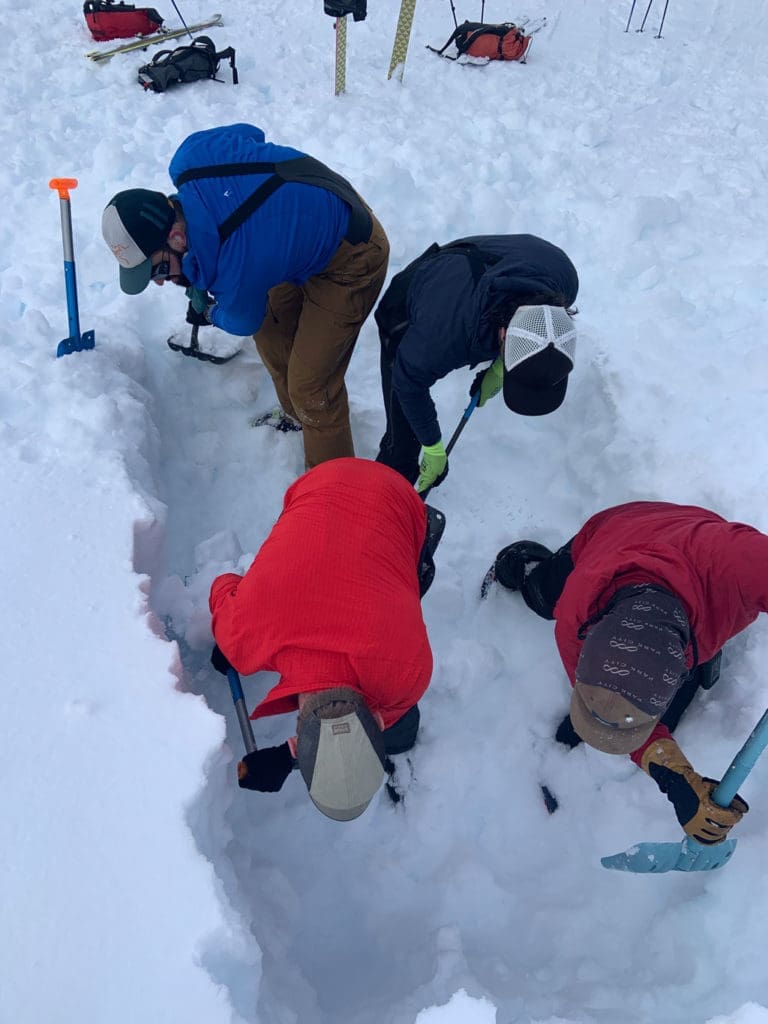
Conveyor Belt Method
The Canadian Avalanche Association (CAA) introduced the conveyor belt method in 2018. This method only works if you have multiple rescuers, and it’s the most useful when you have LOTS of rescuers to help dig (four or more). As always, the more rescuers, the more resources you have, but also the more kittens that someone needs to wrangle or chaos ensues. To help keep folks on track, the conveyor belt method advocates for someone who’s not shoveling (taking a rest) to become the “shovel master” or person in charge of allocating resources and delegating tasks.
The video below demonstrates the method. Take note: partway through the video a fifth person shows up and violates the “A” of the ABCs by standing on top of the victim. Don’t do this. I’ve also got some tips and differences laid out in the steps below, so don’t just watch the video… it’s just okay. The people in the back have a notable lack of hustle and that pains me. Urgency people!!
Step 1: Get the team in line! In the video, the first person is standing with their shoulder touching the probe and everyone else is spaced out one shovel handle (extended) length downhill. A small tweak I’d make is to start one step downhill of the probe and to not just be standing right on top of it to start.
For length of conveyor corridor, that is dependent on slope angle. If the slope is 25 degrees or more, then the digging ramp length can be equal to the burial depth. See screen grab below.
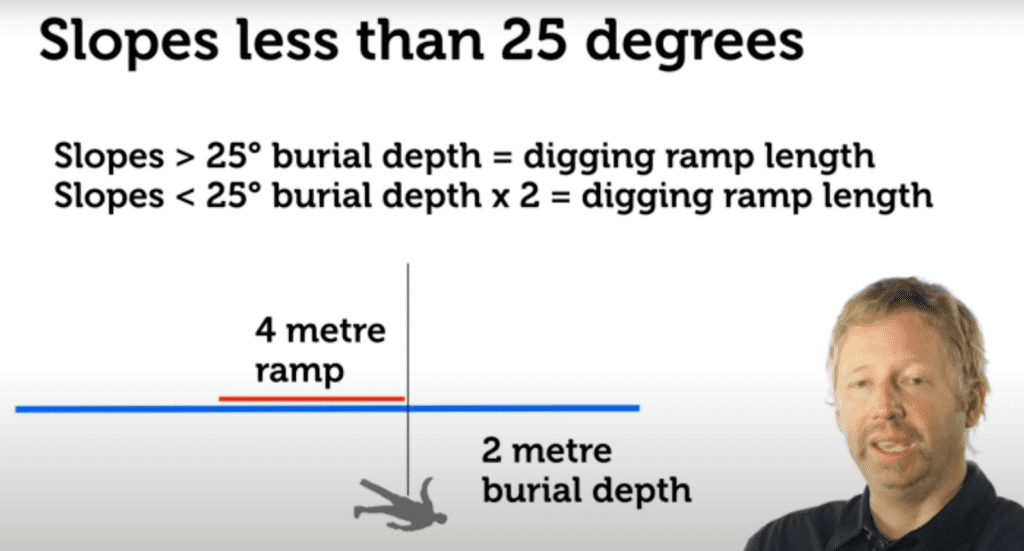
If the slope is less than 25 degrees, then the digging ramp length should be twice as much as the burial depth.
Step 2: Start Shoveling! The person in front is doing most the lifting, but they should just be tossing snow low (no hurling it into people’s faces) and to the sides or just downhill. No need to throw the snow super far as this will only tire you out more quickly. Think “bucket brigade” or “conveyor belt” as they say in the video. Everyone is moving snow back just to the person behind them.
Step 3: Rotate! Once the person up front is tiring and their form is going to crap, rotate them to the back and everyone else moves one space forward. One tip here that isn’t in the video is to keep the shovels in their spots and just rotate the people. The reasoning for this is that most shovels now have the ability to go to “hoe mode” to more easily paddle snow.
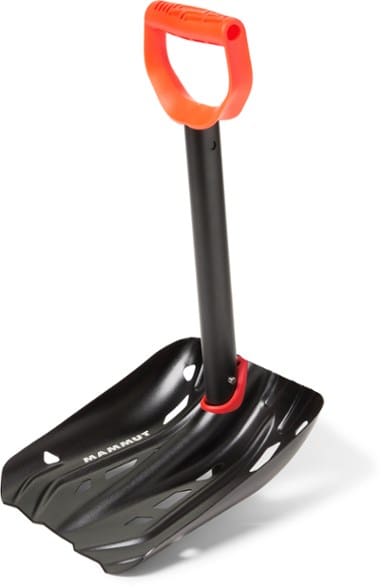
“Hoe” mode works well to move soft snow or already chopped blocks, but likely isn’t the best tool for the people up front who will be chopping through set avalanche debris. So keep the shovels where they are so that folks don’t need to change their own shovels to “hoe” mode or back to normal as they change positions. Efficiency!
Optional Step: If you’ve got the resources (more people than needed to be shoveling) it’s great to have the “shovel master” like I mentioned before. They can then wrangle the kittens and keep things going. That person can either shift to become a shoveler and get replaced by someone else, or, if there are enough humans, they may just stay in that spot the entire time.
Below is another video of the conveyor belt method. This time with 10 rescuers. Instead of single file, they’re 2×2. You can hear the “shovel master” calling directions… at least before the smooth guitar music kicks in.
Strike Team Method
Quite similar to the above conveyor belt method, the Strike Team Shoveling method simplifies spacing, communication, and rotation of shovelers. Rather than recreate the wheel here, y’all should read this excellent resource by BCA that Jordy Shepherd (ACMG/IFMGA mountain guide) put together. You can read that resource HERE. I’ve provided a short synopsis of the technique below along with Rory’s graphics!
Shoveler Positions:
Just like the conveyor belt method, the team lines up in a straight line on the downslope side of the probe (or in any direction from the probe if the debris is flat). The person up from should have one shoulder touching the probe and everyone else should be about 80cm (or fully extended shovel length) from the next person. See the below graphic.
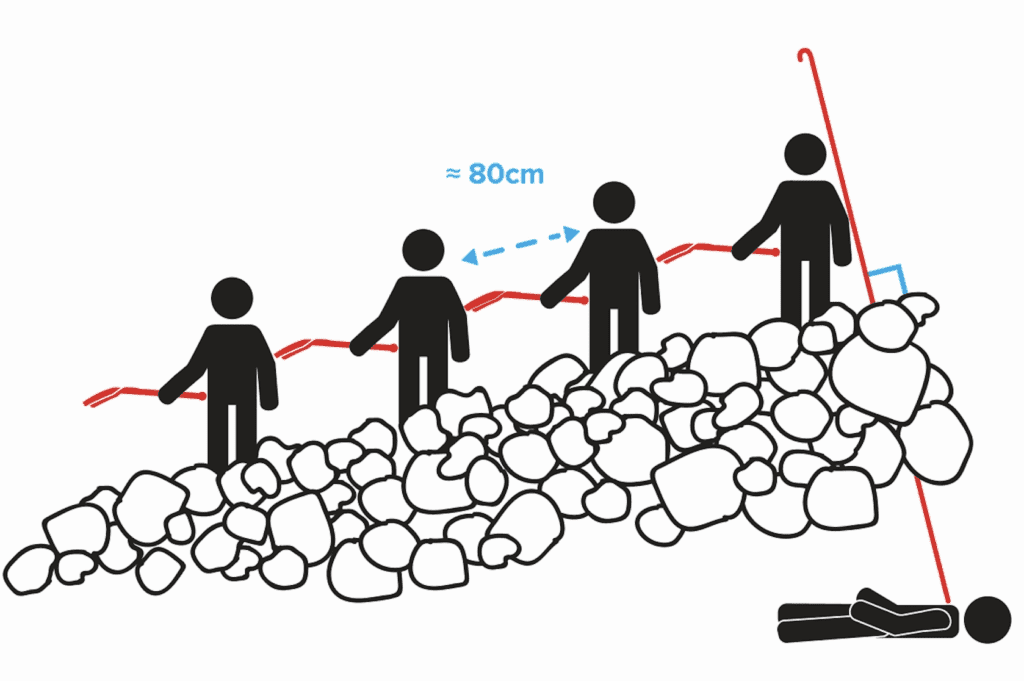
This breaks up the work load so that every shoveler is in charge of about a 1m cross section.
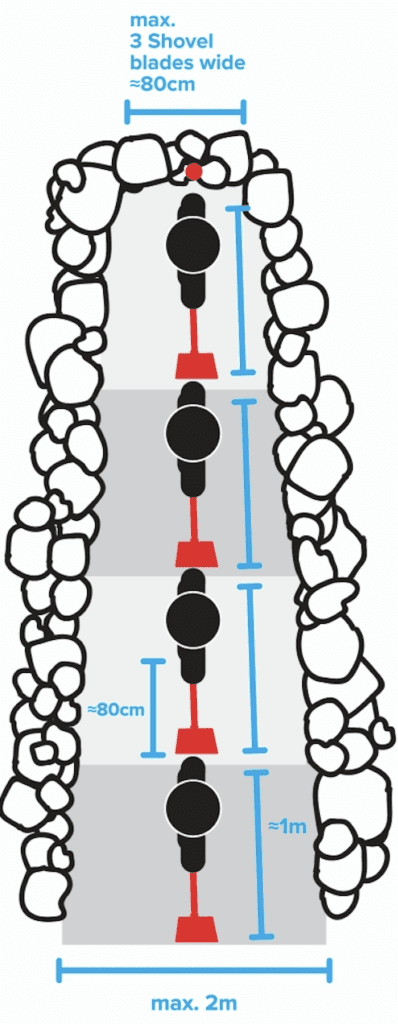
Since the person up front is often working the hardest, every 2-3 minutes, the person closest to the probe should move to the back (or completely swap out if there are enough people). Then everyone else just moves up one position in the line.
To Summarize…
The most time intensive and physically demanding part of a rescue is shoveling. Time is against you in an avalanche rescue, so efficiency is key. In order to get more efficient at strategic shoveling takes practice that can’t come from reading about it. So get out with your team and practice! Take an Avalanche Rescue Course to get coaching from a professional and learn how to practice well! There you will learn how to best practice rescue on your own so you can build good habits.
Hopefully you’ll never have to perform an actual avalanche rescue, but prepare for the worst. Below is one more video from BCA that does a pretty good job of reviewing most these concepts.
Stay safe out there, friends!